Workshop Dust Collector
by Stefan Probst

When I moved to a new residence short before winter, I lost the nice workshop in my old place. The only place left to build boats now was the roof terrace on the 4th floor. It is small (only 2.7 x 4.2 m/9 x 14 feet), but there is one small benefit: the floor tiles are - like everywhere in the house - exactly 1' x 1', so I can easily visualize the size of any boat by just counting the tiles.
A few weeks ago, the weather suddenly got warmer (and even hot) again and I wanted to continue my new hobby. I bought some planks (of unknown wood), hauled them up to the roof, but when I wanted to plane them with my electric planer, I had to stop after the first run: the slightest wind blew the wood dust away and spread it nicely to all the neighbours around. The end before the start? I thought about some kind of curtain of thin plastic that I could roll up during the week when the terrace is used to dry the laundry and let down for wood working. But I do want the wind. In temperatures between 30°C and 38°C (85F to 100F) you like every breeze. The only option left - short of giving up - was to use some kind of a vacuum dust collection system. Most of my power tools seemed to have a connection for something like that, so maybe that was the way to go.
I have an old large vacuum cleaner that's been lying around for many years, but it is for residential use, not industrial. I figured that if I used it directly, I would have to empty the bags every 15 minutes or so. Not a job that I wanted to do that often. So I thought about a two-stage
pre-filter: The first stage would be a dust settlement box, with a function similar to the (first) mechanical stage in a sewer station where the dirty medium is slowed down in a large tank so that the particles can fall out.
The second stage would be a simple filter that keeps lighter, smaller airborne dust from getting into the vacuum cleaner.
The settlement box needed to be reasonably airtight, but still easy to open for emptying. After some unsuccessful searching for a really airtight box, I gave up and settled for something less tight. I found a large plastic bin.
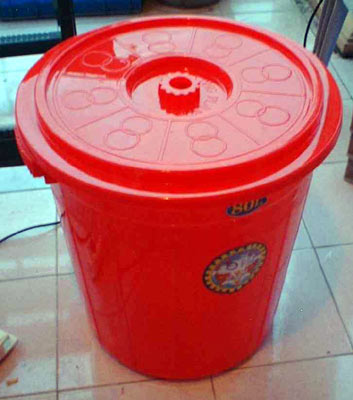
They come in different sizes. The one with 80 l. (about 20 gallons) capacity seemed to be a reasonable compromise. I drilled a hole in the center and mounted an assembly of different sized plastic tubes/pipes and adapters.
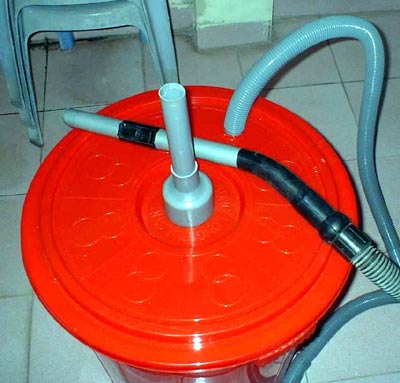
The outer "adapter"
holds the inner tube and, pressed against the lid by the inner "adapter", takes the weight of the vacuum cleaner's hose.

The exact diameters will depend on the diameter of your vacuum cleaner's hose. In my case, I used adapters
with an inner diameter of the next larger size than the main pipe. Usually the adapter would plug inside the pipe, but since I took the larger size, the pipe just goes inside the adapter - though quite tight. Where necessary, a small electric heat gun (700 W was enough) makes the plastic soft enough to widen it up a bit and allow the pipe through. To my surprise, in the end the whole assembly was pretty air tight, and strong enough to support the weight of the cleaner's hose without any glue.
So, the dust would settle inside the big bin and the air would go out throuth the large opening to the vacuum cleaner, I would put an old sock as the second filter stage.
Depending on the kind of dust, I could use socks of different material.
In case the "filter fabric" clogged too quickly, I could increase the filter area by adding a piece of thick pipe inside the bin, drilling a number of large holes, and covering the whole pipe with a long sock....

After mounting the pipe assembly, the big question was whether everything would be airtight enough, or whether I had to do something to avoid air entering the bin around the lid instead of the intake. At that stage the other pipe (to the tools) was not yet installed. I connected the vacuum cleaner and switched it on. And yes, it was tight.
The sucker was so strong that it pulled the lid close and it even bent when the bin was deformed. If that should continue after installing the intake hose, I would have to support the bin's walls with some spreader logs.
Installing the intake hose was a breeze. The grey flexible plastic pipes/hoses are said to originally be meant to drain washing machines. They are cheap and come in pieces of about 1 m (3') length with "mating" ends, so it is easy to connect them to get a longer hose. This means that I can easily disconnect and unclog them in case ....
I connected them to the tool that makes the most dust, i.e. my electric planer and made a first test - without any sock.
The results: The bin still got deformed. No problem, needs just a few spreaders. There was still a bit of dust getting outside. But that was due to the poor connection at the planer. When I connected the vacuum cleaner directly, it was the same. Occasionally a large splinter at the exit of the planer/entry of the hose gets across and dust builds up until the pipe's entry is clogged. With no suction, the dust spreads, of course, like before.
So don't use it in your bedroom! After an hour or so work, I checked the efficiency. About 5% of the dust was outside on the floor. About 5% was in the cleaner's bag. It felt heavy, so it must be small dust. About 90% was in the bin, ready to be used in a composting boat toilet. With some fine tuning the connection between the planer and the hose I surely would get the spilled dust down, and a sock would reduce the amount in the cleaner's bag. With smaller dust, e.g. from the sander, this will be necessary. But at present, I would have to empty the bag only once a day, which I consider as reasonable.
All in all, I am satisfied. A cheap solution (total cost less than 10 US$) that allows me to work in open air and keeping peace with my neighbours. I will still have to take down the drying laundry while wood working, but I can live with that.
Cheers,
Stefan