As I keep mentioning, I feel that OMC-built outboards of from
3 hp up to 40 hp, made from about 1955 until the early 1970's
offer an excellent value for the seeker of cheap outboard power.
One of the many qualities to which I attribute this value, is
the ease with which most of these outboards (with just a few
exceptions) may be converted to both tiller-control as well
as remote control. The various bits of hardware necessary for
remote-control operation of these engines was discussed in the
columns concerning remote control of shift
and throttle, and remote control of steering,
so that aspect has already been covered.
Virtually all OMC engines of under 25 hp (and also some very
early '70s 25's) came from the factory fitted with a tiller,
so no additonal parts or work is required for tiller control
of these engines. Unless a previous owner has removed the tiller
when one of these engines was fitted with remote controls (OMC
recommended leaving the tiller in place), you will get the tiller
with the engine.
The "Big Twins," however, were available either with
a tiller or without a tiller (for remote control only) so if
one wants tiller control over one of the latter engines, a tiller
must be mounted.
Converted a "non-tiller" big twin to tiller control
is no big deal; these remote-control engines usually came fitted
with an engine-mounted "flipper-handle" throttle mounted
on the forward Port side of the engine. Sometimes this was referred
to as a "warm-up" throttle, for use when starting
the engine from the engine, and not from the remote control
location. The warm-up throttle is simply removed from the engine,
and a tiller bolted-on in it's place.
But first, one must acquire a big twin tiller. These are common
swap-meet items, and also are sometimes seen on ebay. Lastly,
one can often be pruchased through dealers of used outboard
parts. I consider a reasonable price for a complete big twin
tiller to be around $30.00 to $50.00. However, the more "convienient"
it is to obtain, the more expensive it will most likely be,
and I have heard of price quotes of $100.00 from the used parts
resellers.
A couple things to keep in mind; first of all, make sure what
you are buying is a big twin tiller and not a tiller from other
models of engines. The only other style of twist-grip-throttle
tiller used on OMC engines made during the time period in question
is much shorter than a big twin tiller, and the big twin tiller
bolts on to the engine in a different manner than the other
style of tiller. Also, the interior throttle shaft is visible
from the underside of a big twin tiller, but is totally enclosed
within the tiller housing of the other OMC tillers.
Be advised that two different styles of "cogs' where used
in big twin tillers. Twist-grip-throttle tillers used on all
OMC engines from this period all operated in the same manner;
the rotating twist-grip throttle was coupled to a internal shaft
in the tiller itself. this shaft has to have a flexible coupling
at the "hinge point' of the tiller (where the tiller folds
unward) and this flexible coupling is accomplished by having
inter-locking "cogs," on the shaft in the tiller,
and also on the throttle shaft extending into the motor itself.
I refer to the two different styles of cogs used, as "pointy"
toothed cogs (used up until 1956) and "ball" tooth
cogs (used after 1956). It really does not matter which style
cog you use, as thery are interchangeable, but you do need to
have two of the same style cog. Also, the "ball" tooth
cog
will be seen to have one extra-large tooth and one extra-large
"gap:" in other words, they can engage in only one
relative postion. Attempting to force engagement with one cog
rotated out of alignment may damage the cogs.
I mentioned the throttle shaft extending into the engine; a
complete tiller will include this shaft, which should come with
the cog needed to engage the cog on the tiller. The other end
(aft end) of the throttle shaft may or may not
come fitted with the pinion gear that engages the vertical throttle
shaft; this same pinion gear is already on the engine and it
is not necessary to get that piece as well. You do need to get
the shaft, though, as the "flipper handle" is permanently
attached to the shaft already in a "remote control-only"
big twin and can not be used with the tiller.
Finally, you should try to get the attaching hardware for the
tiller , which will consist of a bolt and nut, a dished-and-notched
lock washer , and a very thin friction washer.
Step one to making the conversion is to de-grease the engine
so you can see what you are working on. I de-greased the example
engine in 10 degree F weather where the water was freezing on
the engine (and on me). Such is
my dedication to this column.
Next, one can remove the large bolt that holds the throttle
"cover' or "cowling" on. The cover itself can
not be removed until the "flipper handle" and shaft
are removed, but get the cover loose anyway. Note that in the
photos, the big bolt is accessed from above; on some engines
you need to go in from underneath to get to the bolt. Next,
remove the small set-screw from the pinion gear at the aft-end
of the throttle shaft on the motor proper. Remove this screw
entirely, as it passes through a notch in the shaft, and loosening
it only (as it appears would work) will not work. Guess who,
having not made this conversion for several years, forgot about
that when trying to remove the gear from the shaft.
Then have a look at the shaft from underneath. Some of these
engines will have a "stop" mounted on the shaft that
limits it's maximum rotation. This "stop" which looks
like a small lever, will be pinned to the shaft and will need
to be removed in order to remove the shaft. Not all engines
have this "stop." Use a hammer and very small punch
to remove the roll pin which holds the stop on.
At this point, you can withdraw the shaft from the engine. The
pinion gear will be loose so watch that it does not get lost.
Also, there may be small plastic bushings that support the shaft
where it passes through the webs of the castings; don't lose
them.
You are halfway done. Insert the throttle shaft for the tiller
into the engine and attache the pinion gear to it's aft end.
Note that the shaft and the gear have a "flat' on them
for alignment. Then one simply bolts the actual tiller on, being
sure to line-up the cogs correctly. The very thin washer goes
between the tiller and it's mounting boss. Also note that a
nut is used on the mounting bolt; one was not used on the cover
that was orignally there.
I wish to emphasise that the tiller controls both the throttle
and the steering of your engine, so make sure the lock washer
is used on the mounting bolt, and a bit of Locktite would not
be a bad idea, either. Frequent checks of the mounting hardware
during the first few hours of operation are are also warranted.
Make sure that the throttle mechanism operates smoothly. The
most common problem that I have seen is for bushing wear on
the throttle shafts to allow the hinge-point cogs to sometimes
"skip". Although the proper fix is to replace the
little plastic bushings through-which the shafts pass, I have
on occasion managed a reliable fix by adding a shim between
the cogs and the webs of the castings (through which the shaft
passes) by inserting either a very thin washer or sometimes
even a twist of copper wire. If you try shimming, however, be
carefull that you don't shim too much, or the tiller may not
"hinge down" all the way to it's stops.
You will probably want more steering friction with a tiller
than was used with remote steering. These engines are fitted
with steering friction screws in different locations. However,
as I felt the friction available to be inadequate, I have often
run these engines with bungee cords running from the engine
to each side of the boat, such that the engine will self-center
if the tiller is released.
It is also possible to fit these engines with lanyard 'shut-offs"
simliar to modern outboards, and I would suggest that one look
into that as well.
Removing the necessary hardware and mounting the tiller should
take you no more than an hour or so, and the tiller can also
be used in conjunction with remote controls, giving you 'two-station"
control of your boat. Just keep in mind that a control "failure"
could casue injury or worse to you or someone else, so be sure
the tiller is securely mounted and that the throttle function
works smoothly, and as mentioned, a lanyard safety "shut-down"
(to be the subject of a future column) is also not a bad idea.
Three "big twin' tillers
of varying color and grip style- all are interchangeable. To
the left is the "throttle shaft" that you also need,
fitted with a "hinge point" cog on one end, and the
pinion gear (which you should already have) at the other end.
The underside of a big twin tiller;
note that the internal shaft is visible. The shaft is not visible
from the underside of other twist-grip OMC tillers. The throttle
shaft is sitting in it's relative position.
The big twin tiller is on the
left; the green tiller on the right is of the style that you
do NOT want. The internal shaft is not visible from underneath;
it is also shorter. HOWEVER, the hand grips ARE interchangable
with the grips on the big twin tiller, as are the "hinge
point" cogs
Our "victim" engine;
an early '60s Gale 25 hp. I have always
liked the style of hood on these 60's Gales. Not that it has
anything to do with the price of rice in China.
On the right in the photo below
is the "flipper handle" of the warm-up throttle. this
will be removed and the tiller mounted in it's place.
The throttle handle, to the left,
is attached to a horizontal shaft which runs to the right and
ends with a pinion gear, which engages another gear on a vertical
shaft. The throttle cable for remote controls attaches to a
lever on the gear on the vertical shaft (click to enlarge).
looking underneath the engine,
one can see the throttle shaft connecting the flipper handle
to the pinion gear towards the right (click to enlarge).
In the center of the photo a
wrench can be seen in place on the mounting bolt for the cover
to be removed. Note that this hardware is SAE and NOT that silly
metric stuff (click to enlarge).
The cover has been loosened and
is just sitting on the throttle shaft; a screwdriver is being
used to remove the set screw that holds the pinion gear to the
throttle shaft. Note green sleeve of parka; 10 degrees F and
I am working on a Duckworks column. (click to enlarge)
The parts removed sitting on
the stern of the Larsboat; the fliipper handle and shaft; to
the imediate right of the shaft is the pinion gear and it's
set screw; the throttle cover or cowling; the mounting bolt
for the cover and the lock washer for the bolt.
This is what the engine looks
like after removing the above parts. (click to enlarge)
This is what we are installing;
the tiller with it's retaining bolt, nut, and washers; also
the throttle shaft. Note the "ball" tooth cog on the
tiller with a big gap in the teeth on the bottom.
The throttle shaft for the tiller
has been inserted and the pinion gear attached to the aft (right)
end. The shiny brass teeth of the cog can be seen to the left.
Note that the shaft and the pinion gear have "flats"
for alignment (which you can not see in this photo)(click to
enlarge)
Bolting on the actual tiller.
Be sure to align the teeth of the cogs at the hinge point, and
don't forget the lock washer. If your tiller falls off and you
kill someone, don't blame me. I told to to check it frequently
for several hours of operation.
Make sure the cogs engage properly;
you may need to replace bushings or slightly shim them if the
cogs "slip" ( "jumps teeth"), but if you
shim, don't shim so much that the tiller will not go all the
way down. If your cogs are really worn, you may need to replace
them.
A photo taken in 1994 of a 1959
Evinrude 35 hp that I mounted a tiller on, painted with a couple
spray cans of Tempo "polychomatic blue," and ran on
the Mississippi River for a summer. Still have the engine but
have not run it in years.
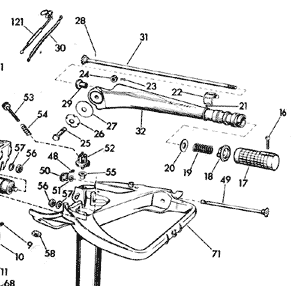
A parts diagram showing the
tiller and related parts, and.....
(click to enlarge)
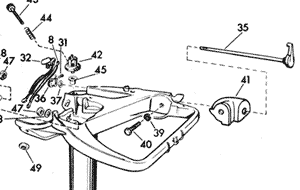
...a parts diagram showing the
"flipper handle" warm-up throttle and related parts.
(click to enlarge)
Max