A few months ago, an interesting article
on bird's mouth spars was published right here, at Duckworks.
The author, David Farless, presented a series of equations
to accurately calculate the size of such a construction.
This has inspired me to study this subject in greater depth.
In this article, we will explore some of the limits and
potentials of bird's mouth spars. You will also be provided
with tools to let your computer do the size calculations
for you. But first, a quick reminder...
What is a bird's mouth spar?
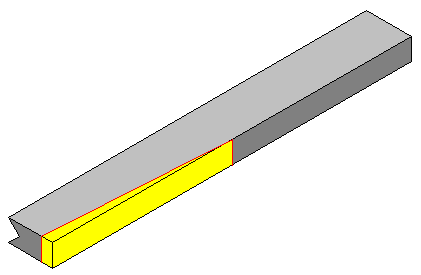
A bird's mouth spar is a way to make
a hollow mast or spar from wood for use on a sailboat. Figure
1 below shows what the cross section looks like. It typically
uses 8 identical pieces of wood or staves glued together.
The outside is then trimmed to produce a round spar. The
main goal is to save weight.
Figure
1- Bird's Mouth Spar : Definitions
O.D. is the
outside diameter I.D. is the largest inside diameter R1 is the shortest inner
radius R2 is the largest inner
radius or half I.D. N is the number of sides (eight
in this case)
(alpha) is the angle between adjacent
staves or 360° / N L is the width of material H is the thickness of material
Important Ratios
K is the thickness
to width ratio of staves or (H / L) M is the "conversion factor" or
(O.D. / L) A is the inside to outside diameter
ratio or (I.D. / O.D.)
The definitions used here are pretty
much the same that were used in the previous article. I
have only added a few names for the ratios that will be
of interest here. The model shown in Figure 1 is of "classic"
proportions, that is, a stave's thickness ratio of 0.5 in
an 8-sided configuration. Although I have never seen other
configurations, it is possible to build a bird's mouth spar
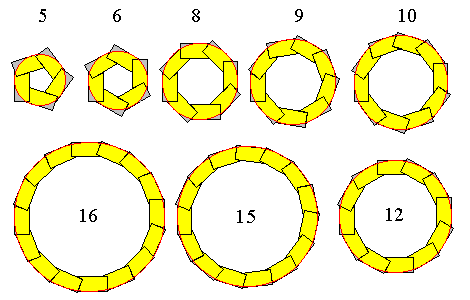
with a different number of sides. Figure 2 shows some of
the possibilities.
Figure 2- The
world of Bird's Mouth Spars
Okay, you might think that the math for
size calculations would be far too complex for such configurations,
right? Well, no! The equations presented by David Farless
in the previously mentioned article
had a hidden potential. With just a minor modification,
these equations can handle any possible configuration! From
now on, we will refer to these as the Farless equations.
(Always give credit when credit is due!) The revised equations
can be found in the Appendix section.
The trick for building a spar with more
or less than 8 sides is in the V-notch angles used on the
staves. Figure 3 shows them in a little bit more detail
than Figure 2. Table 1 gives you the angles used and a few
other points to take in consideration.
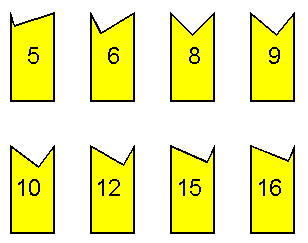
Figure 3- Stave
shape
Table 1- Basic
rules for bird's mouth spars
Number
of sides
Angles
for the
V-notch (degrees)
Theoretical
limits
for ratio(K) or (H /L)
Practical
range
for ratio (K)
N
Angle
1
Angle
2
Minimum
Maximum
5
72
18
0.1407
1.0515
not
recommended
6
60
30
0.1200
1.1547
0.195
- 0.85
8
45
45
0.0929
1.4142
0.15
- 1
9
40
50
0.0834
1.5557
0.135
- 1.15
10
36
54
0.0757
1.7013
0.125
- 1.3
12
30
60
0.0637
2.0000
0.105
- 1.5
15
24
66
0.0515
2.4586
0.085
- 1.875
16
22.5
67.5
0.0483
2.6131
0.08
- 2
18
20
70
0.0431
2.9238
0.07
- 2.25
20
18
72
0.0389
3.2361
not
recommended
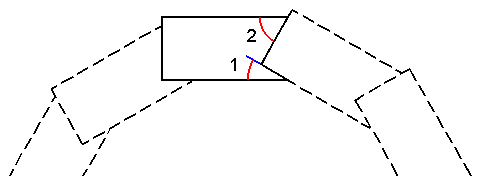
Angle 1, shown in Figure 4 below,
is located on the inside of the spar. Its value is always
the same as "" (alpha),
shown in Figure 1. Angle 2 is on the outside
and is equal to 90 degrees minus the first angle.
Figure 4- Stave
Angles
Table 1 also lists minimum and maximum
limits for the thickness ratio of the staves (K). The minimum
theoretical limit is reached when I.D. is equal to O.D.
Figure 5 below shows an example of K going too far in that
direction. In practice, you obviously need to use a higher
ratio to have some thickness left! Otherwise your spar will
fall apart when you try to round the outside. That's where
the practical range comes into play. The minimum practical
limits shown in Table 1 corresponds to the maximum weight
saving possible for a given strength. (More on that later.)
Figure 5- Going
too far: K is too low, I.D. is larger than O.D.!
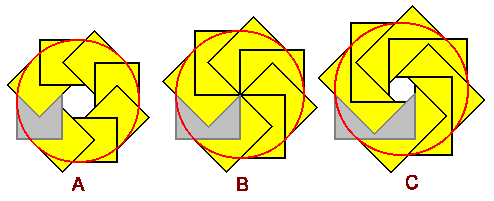
The maximum theoretical limit is reached
when I.D. equals zero (See Figure 6B). You can actually
exceed that limit: the inside will open up again (Figure
6C). However, the formulas for calculating size can produce
some weird results when you go in that zone. Better stay
below that maximum limit. Here again, a practical upper
limit for K has been shown. This maximum practical limit
was chosen at the point where the weight saving falls to
5 percent compared to a solid spar of equal strength. (More
on that later too.)
Figure 6- Going
too far, high values of K
A- "Practical Maximum"
B- "Theoretical Maximum", I.D. = 0
C- Gone too far, formula results unpredictable
You may have noticed that both the 5
and 20-sided configuration have the comment "not recommended".
Here is why. For these, one of the angles used is very sharp.
This means that the corresponding side of the V-notch becomes
very thin (See Figure 3). This may be too fragile, at least
during assembly. But this may very well be a weak spot under
stress, even when glue has cured. This potential problem
would only get worse for any larger number of sides and
sets the limit of what you can do. This is one reason why
8-sided spars are far more common. For an 8-sided spar,
the angles are equal and each side is of equal strength.
And the glue area of the V-notch is also the largest at
45 degrees. So it is probably not a good idea to go very
far from that 45-degree value. It may be wise to use a number
of sides between 6 and 12. The smallest angle never falls
below 30 degrees with these.
Configurations using 7, 11, 13, 14, 17
and 19 sides are not discussed here: the angles required
with these are just too odd.
Now that we have looked at some of the
limits of bird's mouth spars, let's look at ways to simplify
size calculations.
Size Calculations
For those of you who have read the previous
article
written by David Farless, you already know that accurate
size calculations are not really simple. That article also
mentions a "rule-of-thumb" solution originating from a WoodenBoat
article (I must admit that I have never read that article).
The outside diameter was defined as 2.5 times the stave
width. However that solution is not entirely accurate. In
fact, both the width and thickness of the staves have an
effect on the resulting diameter.
Wouldn't it be nice to have a solution
that offers the simplicity of the WoodenBoat rule-of-thumb
and the accuracy of the Farless equations at the same time?
Better still, wouldn't it be great to have a computer program
that does the calculations for you? Well, that is exactly
what we'll do!
First, our new rule-of-thumb. If you
look back at Figure 1,
among the definitions, there is a ratio called "M". It is
defined as O.D. divided by L. That is exactly the same thing
as the "2.5x" from the WoodenBoat article. We "only" need
to figure out what is the real value for "M". That ratio
is defined in the Appendix if
you are really "math curious". Table 2 below, however, will
save you time. It gives you pre-calculated "M" values for
6 to 12-sided spars. The cells are highlighted in pink
when K falls outside the "Practical Range" defined in Table
1. You should avoid these. No values are shown when K falls
outside the theoretical limits of Table 1.
Choose the stave thickness ratio and
the number of sides that you want to use, look up the corresponding
value of "M" in the table, and you have everything you need
to do the size calculations. Let's do an example.
Example 1
Let's say we want to build a 3-inch diameter, 8-sided
spar. If we choose a stave thickness ratio (K) of
0.5, the resulting value for M is 2.561 (highlighted
in yellow in Table 2). The value for the stave width
(L) is then:
L = O.D. / M
L = 3 inches / 2.561 = 1.171 inches
Since we chose a stave thickness ratio of 0.5, the
thickness of the stave (H) is
(0.5 X 1.171) or about 0.586 inches.
You can download a text version of Table
2 and print it on a single page. (You may have to adjust
the page margins and the font size to achieve that). With
this table at your disposal, you can do the calculations
by hand if you have to.
Let's now
look at the easiest method: your PC doing the calculations
for you!
Bird's Mouth Spar Size Calculators
Instructions
Choose the Calculator that suits your
needs. Enter the values of your choice on the left, then
click on the "Calculate!" button. Results will appear on
the right. An error message will appear in the Status box
if your inputs don't work out. You can clear all entries
by clicking on the Reload or Refresh button of your Web
browser. Or you can just enter new inputs and click on "Calculate!"
again. Clicking on the pictogram in the middle will lead
you back to Figure 1, in case you need a reminder for all
those definitions. Dimensions must all be in the same units.
Ex.: Inputs in inches give results in inches.
Hints to avoid error messages (in
the Status box)
Input values must be numbers higher than
zero (no negatives, no letters).
The number of sides must be 5 or more.
I.D. must be smaller than O.D. (obviously).
H or K must not be too small or too large (less obvious).
H must be smaller than the radius or half the diameter.
Dealing with a Tapered Mast
There is one case where the Calculators
above will prove handy: building a mast with a taper. A
taper means that the mast diameter will gradually be reduced
in size as you go up. I have never built a bird's mouth
mast so far; I have only drafted a few in TurboCAD. So,
I think the easiest way to build a tapered bird's
mouth mast is to cut a taper in the width of the staves,
leaving the thickness constant all the way. Figure 7 below
illustrates this. As you can guess, the length has been
condensed to better show what is going on.
Figure 7- Creating
a taper : just cut away the yellow section
The yellow section would be removed to
produce a tapered mast. This is the easiest cut to do: your
piece of wood would be lying flat on its largest side. It
sure beats cutting a taper on the V-notch side. It is also
the best compromise for strength. By cutting this way, the
thickness ratio would go up, minimizing the strength loss
caused by a smaller end diameter. It also keeps the glue
joint surface at its maximum.
Let's do an example. You can try it for
yourself as we go along.
Example 2
Step 1
Let's say we want to build a 3-inch
diameter mast with a tapered top diameter of 2 inches.
We will do a 12-sided mast this time. We can start
with the bottom section of the mast using either Calculator
2, 4 or 5. Let's say we want to use O.D. and I.D.
as inputs. This means we must choose Calculator 2
to do the job. Let's choose an I.D. of 1.75 inches.
The results obtained for L and H are:
L = 0.780 inch at the bottom
H = 0.655 inch
Step 2
Now, for the final dimensions at
the top, we use Calculator 4 and enter our final O.D.
of 2 inches and the value for H we have just calculated.
The final stave width (L) we obtain for the top is:
L = 0.512 inch at the top
So we have to remove (0.780 - 0.
512) or 0.268 inch at the top, gradually reducing
to zero at the point where we go back to the full
3-inch diameter.
This approach could be extended to multiple
levels of taper.
Weight Saving and Strength Loss
We now arrive at the core of the subject:
the weight saving that a bird's mouth spar can achieve.
The information presented here is based in part on the "Farless
equations", with one refinement. The formulas for relative
mass and strength presented in that article were (and still
are) first approximations. In the case of the strength formula,
that approximation is also the worst-case figure, so it
is a good idea to keep it as is.
The relative mass equation, though, can't
be used to compare relative mass (or weight saving) for
various configurations. It does not take into account the
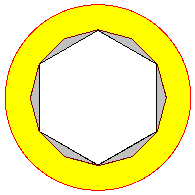
number of sides. Figure 8 below shows you why we must take
that in account. It shows, using the same I.D. and O.D.,
a 6- and a 12-sided spar, superposed. The 12-sided spar
area is shown in yellow; the 6-sided spar has additional
area (in grey). Although these two examples have the same
theoretical strength, the 6-sided spar is heavier.
The accurate formula for weight saving
is substantially longer than the first approximation (see
the Appendix Section).
Figure 8- Cross
section area comparison, 6- and 12-sided configuration
So how does a bird's mouth spar compare
to a solid spar in terms of weight saving and strength?
To avoid comparing apples and oranges, we will use the ratio
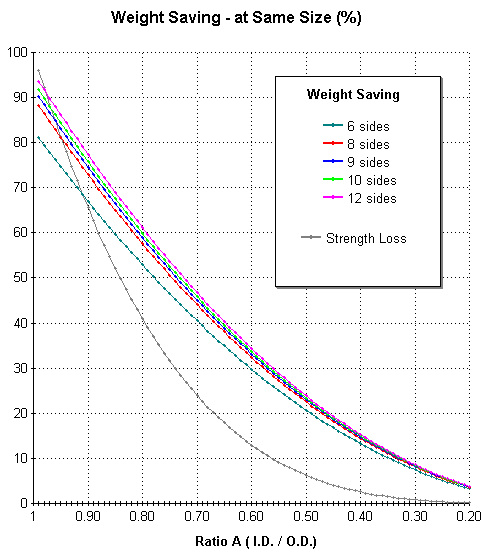
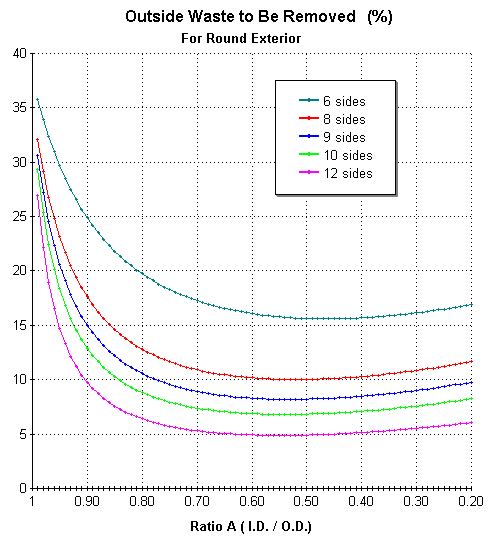
A or (I.D. / O.D.). First, Figure 9 below compares bird's
mouth spars to a solid round spar of the same size or diameter.
We can see that the weight saving increases with the number
of sides. The difference is more important for high values
of ratio A (thinner spar). The weight saving can look fantastic
there, if you forget to look at the strength loss curve
(in grey), which is the same for all configurations. You
obviously don't get something for nothing. As ratio A comes
closer to unity, you start to loose strength faster than
you loose weight. Not an improvement. The range used for
ratio A in these graphs stops at 0.2: at that point, the
weight saving falls to about 5%, our "practical limit" for
maximum K (See Table 1).
Figure 9- Weight
saving compared to a solid round spar of same size ...Round
Exterior
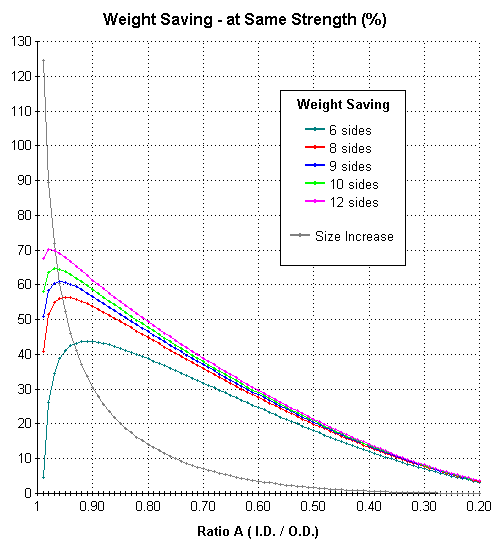
There are two solutions to get a big
weight saving without losing too much strength. First, use
a larger diameter than the original solid spar. You can
achieve the same theoretical strength and still save weight.
Sounds too good to be true? There is one drawback: you end
up with a larger spar. The larger the weight saving, the
larger that spar becomes. You might end up with a spar that
is just too large to be practical. Figure 10 below shows
you what you can expect to achieve. The grey curve shows
you how much bigger the spar must be to achieve the corresponding
weight saving. We can see, for example, that a 12-sided
spar can achieve a maximum weight saving of 70%! But to
do so, its diameter must be about 90% larger than a solid
spar! A less extreme example, the "classic" configuration
(8-sided, K=0.5), requires a size only about 5% larger for
equivalent strength, while saving about one-third in weight.
Not bad!
(A note, here, you can use the Size Calculator
#2 to figure what is the value of K for a given ratio A.
Enter the number of sides you want to use, enter "1" for
O.D. and enter the value A in the "I.D." input box. There
is also a conversion table in the Appendix section.)
Figure 10- Weight
saving compared to a solid round spar of same strength
...Round Exterior
This graph reveals something interesting.
As you go for a thinner spar, the weight saving goes up,
until it reaches a peak. That peak, by the way, is the practical
minimum ratio K proposed in Table 1. If you try a thinner
value past that point, the weight saving starts to fall
down again. This happens more or less in the graph area
located on the left side of the "Size Increase" curve. You
should avoid using values in that area: not only you won't
save more weight, but also the size increase becomes enormous!
There are two explanations for this phenomenon. This problem
is due to the fact that the inside and outside shape are
different. If both the inside and outside were the same
shape, the weight saving would continue to climb on that
graph. But because of the "corners" or vertex of the polygon
shape, you end up with a big difference between minimum
and maximum thickness. Those vertex are weak spots that
put a limit on optimum weight saving. Another way to look
at it is in the amount of material that you must remove
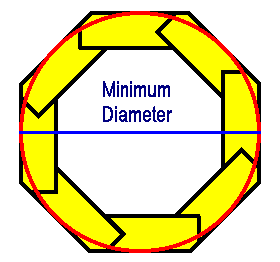
to obtain a round exterior (See Figure 11). As a 12-sided
spar is much "rounder" than a 6-sided, there is less waste.
But even with a large number of sides, for very thin stave
construction, you waste more material, weakening your spar.
Figure 11- Outside
waste that must be removed to obtain a round exterior
The graph of Figure 10 tells you how
to achieve the best weight saving, for a given strength.
The highest results are achieved with a pretty large increase
in size, perhaps too large. In real life, you would probably
want a good compromise between weight, strength and size.
Figure 12 below is an attempt at finding such a compromise.
This Arbitrary Score is not a "scientific" calculation.
The curves shown were obtained by subtracting the Size Increase
curve from the Weight Saving curves of Figure 10. This is
a "two-thumbs up" kind of rating. It rewards good weight
saving but penalizes large size increases. It does shows
where the overall good compromises are. You have to take
the results with a grain of salt. You can get equal scores
for very different weight saving values. On the left portion
of the graph, high score values reflects great weight saving.
On the right portion of the graph, high score values reflects
minimal size increase. If weight saving is more important
to you, go "left". If you want to replace an existing solid
mast and you are limited in space, go "right".
Figure 12- Arbitrary
Score compared to a solid round spar of same strength
...Round Exterior
The second method to maximize strength
is to keep the exterior in the same polygon shape as the
inside (See Figure 13). This is not as pretty, but you don't
hit the same weight saving limit as a rounded bird's mouth
spar. That's because the ratio A (I.D./O.D) is constant
all around. And for a beginner like me, it might be easier
to build. A 12-sided spar done this way wouldn't look too
bad. For weight saving and strength comparison, we will
use the minimum diameter for that polygon. This will allow
us to use the same overall size calculations as a rounded
spar.
Figure 13- Polygon
exterior shape
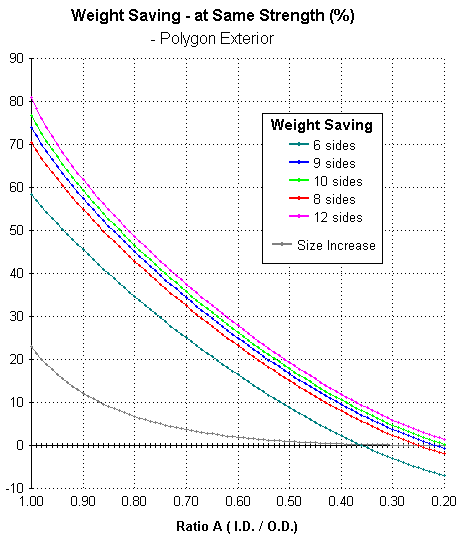
Figure 14 compares a polygon-shaped bird's
mouth spar to a solid round spar of equivalent strength.
You can see, if you compare with Figure 10, that the weight
saving can reach higher values. And the increase in size
required to maintain strength is smaller. That's for high
values of A. Although the graph stops at a maximum of one,
ratio A can actually exceed one with such a configuration.
That's because I.D. has been defined in diagonal, while
O.D. is measured straight across.
Figure 14- Weight
saving compared to a solid round spar of same strength
...Polygon Exterior
Table 3 below gives you the maximum limit
for (A). At that point, the stave thickness has reached
zero.
Table 3- Maximum theoretical values
for ratio (A) - Polygon Exterior
Number
of sides (N)
Maximum
Ratio (A)
(I.D. / O.D.)
5
1.2361
6
1.1547
8
1.0824
9
1.0642
10
1.0515
12
1.0353
15
1.0223
16
1.0196
18
1.0154
20
1.0124
When ratio (A) and the hollow area becomes
small, you can reach a point where you no longer save weight!
You end up with a higher weight than a solid round spar.
So, for a thick stave, this configuration is not a good
idea; the rounded version is a better choice for that.
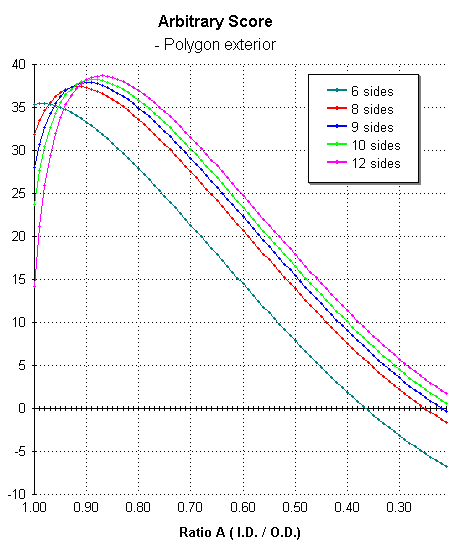
Figure 15 below shows the Arbitrary Score
for a polygon shape. The peak score is a bit higher than
for a rounded version. But you hit negative values at the
right end of the graph, just like Figure 14.
Figure 15- Arbitrary
Score compared to a solid round spar of same strength
...Polygon Exterior
The outside waste, for a polygon exterior,
is obviously much smaller than for a round exterior, as
can be seen in Figure 16 below. The waste increases as the
hollow area becomes smaller.
Figure 16- Outside
waste for a polygon exterior shape
You may have noticed, throughout these
graphs, a large gap between the 6-sided and 8-sided configuration.
That's because no 7-sided curves were done. This gap also
tells you that an 8-sided spar would be a much better choice
than a 6-sided one.
All the strength calculations are theoretical
strength values. The formulas use what is called the moment
of inertia. This is a fair estimate as long as the stress
is uniformly distributed. In real life, there are always
some localized stress points, like at the mast partner,
for example. So you may have to add some extra reinforcements
in critical areas to avoid bad surprises.
This about covers what I had to say about
bird's mouth spars. I hope you have found this "exploration"
interesting. Feel free to have a look at the Appendix
section where the formulas used and the graph results in
Table format are shown.


 (alpha) is the angle between adjacent
staves or 360° / N
(alpha) is the angle between adjacent
staves or 360° / N