IMP
design by Gavin Atkin
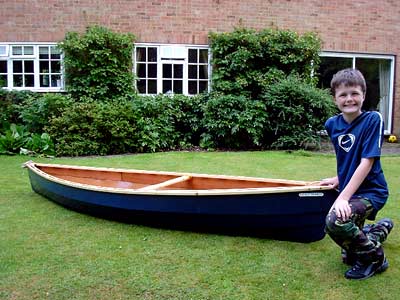
Gavin Atkin designed this lovely
little lapstrake canoe for a friend
and has generously offered the plans as a free download. Currently
he is even building one for himself.
Below are the building notes which come in the zip file, as well
as a few samples of the drawings which are in both .gif and .dxf
formats.
Building Notes
From building one prototype for
this boat and having been involved in another, by a conventional
and rather labour intensive method, I became convinced there was
a better and simpler way of building this little canoe with such
classic lines.
Here's the idea. I don't see how
to avoid having to make some sort of strongback and moulds, because
a key feature of this design is the hollow at the bows, which
can't be achieved by s&g alone. The garboards are made wide
to give the boat stability and fixed to each other and to the
next strake by stitch and glue - really they have to be because
the angle between the two is so acute in the centre section. However,
the next strake - the third - is stitched to the second strake
such that it laps it by a measured amount, prior to filling the
lap with epoxy putty. The same principle is applied to fourth
and third strakes. You'll need to plane the outer corners of both
the second and third strakes to accept the uppermost strakes to
provide good wide glueing (faying) surfaces. Use a Surform for
this if your carpentry is as poor as mine, btw.
Now I have introduced the basic
principle, the order of building goes like this:
- Set up a strongback and moulds
as shown in the drawing. The first three moulds are placed such
that the distance from the stem to be is to their aft-most side,
so that the material can be tapered using a batten so that it
conforms to the curved strakes of the boat. The strong back should
be made of fairly rigid material, but the moulds may be of something
a little softer - the prototypes were built on chipboard moulds
cannibalised from an unwanted wardrobe. A taught sting from one
end of the strongback to the other should be used to line up (centre)
the moulds - notch or otherwise construct the strongback or frames
to allow this. Also, sight along the moulds and from the sides
to make sure the moulds line up top and bottom, and do not lean
fore and aft. Finally, cover the moulds with polyurethane food
wrap, non-stick masking tape or whatever to prevent the hull becoming
stuck down.
I have tried to keep the number
of moulds down, and you may be grateful to notice that I have
limited them to five :-)
- Place an 11ft keelson along the
moulds and fix it firmly in place using screws and small wedge-shaped
chocks - you will need to be able to reach the screws to remove
them when the time comes to liberate the hull from the moulds.
Also fabricate and attach the stem and stern. I've found a really
good way to do this is to mark out the shape on a piece of flat
cheap material, such as more chipboard, and then to cut it out.
I then cover it in polythene food wrap using masking tape. The
next step is to cut and assemble pieces of my timber such that
they covered the shape required with a little of the stem or stern
material overlapping the template. Using 1 1/2 by 1 material,
I managed to do both stem and stern for my prototype Imp in five
pieces: three for the outer edge, one reinforcing piece on the
inside, and one more to mate with the keelson. I then glue these
together (using epoxy mixed with filler to make the glue) and
clamp them. Once the glue has gone off, you can mark round the
template and removed the excess on the stem and stern before glueing
and screwing the stem and stern pieces to the keelson and to the
strongback.
- Now we have the strongback complete
with moulds, keelson and stem and stern, it's time to scarf the
panels, and to mark out and cut the 3/16in ply material to size
and shape. Don't use 1/4in ply, as it's too heavy to make the
bends required, and will make your boat heavy besides. The scarfing
can be done in a variety of ways according to taste and to ability,
but I prefer to do it the dog-simple way by butting the material
and taping it first one side and then the other. Naturally you'll
need to turn the sheet over very gingerly when only one side has
been taped in order to tape the opposite side. Use a good flat
surface for supporting the material as the epoxy goes off before
applying the second tape, and take care also to fill any slight
gap that might have appeared between the butted sheets, for air
bubbles are the enemy of this process. Another enemy is poorly
mixed epoxy - so mix it really well, using something like two
hundred swirls before being satisfied even with a small pot-full.
And don't accept anything less than a good job or your boat will
have kinks in its planking. If you make a scarf this way and it
isn't right, remember that a blow-lamp will enable you to quickly
remove a tape and allow you to start again.
I've provided my usual coordinates:
x is the distance in inches along the bottom and y is the vertical
distance in each case. I find it helpful to rule off the material
in ten-inch squares before beginning the plotting process. Once
the marking out is completed and checked - always measure twice
and cut once except where you measure three times - I recommend
cutting out the shapes using an ordinary handsaw partly because
your mistakes will be smaller than if you use an electric saw,
and partly because the resulting sawcuts will often be neater.
Some people prefer a pullsaw for this kind of work, but I don't
see the advantage myself.
- The next task is to trim the
stem and stern pieces and the keelson so that the panels will
lie snug. This can be done by clamping or screwing the panels
to the moulds to try the fit, and then trimming the stem or whatever
using a plane or a spokeshave or Surform, depending on your level
of skill. The stern and stem pieces should trim down virtually
to a knife edge, and the garboards (the first strakes) should
butt each other for almost the whole length of the boat, though
I do not think it is possible to expect them to do this at the
turn of either the stem or stern. These areas will eventually
be covered with a protective strip, however.
- At this point I think assembly
can safely begin. The garboards should be glued and screwed to
the keelson, screwed temporarily to the frames and glued and screwed
tight over the stem and stern. The second strakes are to be stitched
and glued to the garboards. Hopefully, this should be a simple
procedure requiring no more fitting! However, when the third strake
is attached, small lands will be required to be cut in the second
strake and the stem and stern to 'let in' the next strake up so
that each strake lies nicely along the stem or stern. These lands
are half-inch wide rebates that start 3-4in from the cutwater
and increase in depth until at the apex of the cut water the lower
strake has been entirely cut away - or nearly so. These rebates
take little time to cut: just a few stroked with the saw followed
by a few moments' work with a sharp chisel or a rasp.
Once the lands are cut, the edges
of the lapped strakes should be trimmed with a plane or Surform
to enable the following strake to lie neatly and to create a nice
wide gluing surface that will require the minimum of epoxy glue.
Then stitch the strakes together using doubled-up cable ties with
the aim of pulling the strakes together and achieving a fair curve
- When all the strakes are in place,
the garboards and second strakes are stitch and glued, and the
third and fourth strakes have been assembled and glued into place,
use epoxy putty to fill in the vee-shaped laps as required. Finally,
add the gunwales (outwales to you over-the-ponders).
By this point you should have a
shapely hull still on its moulds. If you have luck on your side,
the hull will come off the moulds easily, and you will be able
to place a temporary stretcher in place of the central mould while
you take care of the carpentry.
- The rest of the job is
down to conventional carpentry of the kind you will find in many
boat-building books. The boat needs breasthooks, a gapped inwale,
and a stretcher placed a little towards the bows so that the user
will be able to carry it on their shoulder, and the crew can paddle
the boat unimpeded.
|