 Building
a small gaff-rigged yawl, we needed lots of blocks. I was able to find
good ones, or cheap ones. Cost was an incentive, but the 'plasticy' look
of the commercial products was as big a factor for me. Having built the
boat, made the spars and sewn the sails, buying rigging didn't feel right.
Fortunately I'm not yet crazy enough to make my own rope. Building
a small gaff-rigged yawl, we needed lots of blocks. I was able to find
good ones, or cheap ones. Cost was an incentive, but the 'plasticy' look
of the commercial products was as big a factor for me. Having built the
boat, made the spars and sewn the sails, buying rigging didn't feel right.
Fortunately I'm not yet crazy enough to make my own rope.
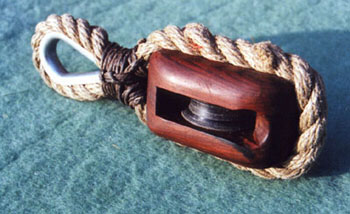
Rope stropped blocks have very few metal parts; they can be made and
repaired with hand tools. They work, and for me, they just look right.
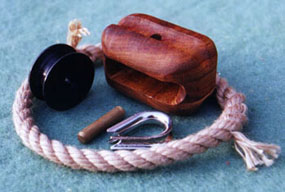 Four
components make up the basic block; a pulley or 'sheave' for the rope to
run over, an axle or 'pin' for the sheave to turn on, a wooden body or
'shell', and a 'strop' - generally a grommet - an (almost) endless rope
loop to wrap around the whole, providing an attachment point. The wooden
shell can be carved out of a solid lump of wood (a 'mortised' block) or
assembled from smaller bits of timber (a 'made' block). These are made
blocks. Traditionally, made blocks have the parts of their shells both
glued and riveted together. With modern adhesives, a made block should be
as strong as a mortised block. Rivets optional.... Four
components make up the basic block; a pulley or 'sheave' for the rope to
run over, an axle or 'pin' for the sheave to turn on, a wooden body or
'shell', and a 'strop' - generally a grommet - an (almost) endless rope
loop to wrap around the whole, providing an attachment point. The wooden
shell can be carved out of a solid lump of wood (a 'mortised' block) or
assembled from smaller bits of timber (a 'made' block). These are made
blocks. Traditionally, made blocks have the parts of their shells both
glued and riveted together. With modern adhesives, a made block should be
as strong as a mortised block. Rivets optional....
Materials:
Shell: Ideally, the wood for block-making should be light,
tough, durable and easily obtained - look around and see what's available
locally. The
USDA gives online information on the properties of all sorts of wood.
Mail order suppliers can provide small pieces of tropical hardwood stock
at moderate cost. The examples here are Canary wood (Centrolobium) and
Cocobolo, a Rosewood relative, both from
Lee Valley. Elm was traditionally used for block shells, since its
interlocking grain made it resistant to splitting.
Sheave: UHMW (Ultra High Molecular Weight) polyethylene is
soft enough to be worked with wood working tools, self lubricating, and
impervious to moisture. It can be obtained in small quantities from wood
working suppliers - again mine came from
Lee Valley. Alternatively, check under Plastics suppliers in the
'phone directory. Those white plastic kitchen chopping boards would
probably work in a pinch. Other options include Lignum Vitae (the natural
equivalent of UHMW, self lubricating oily hardwood, now a scarce
resource); A sheet material made from cloth laminated with phenolic resin
by Micarta (and other companies); Commercially manufactured sheaves in
plastic or bronze.
Pin: Brass rod can be obtained from the hardware store.
Quarter inch diameter is easy to find, and conveniently compatible with a
number of small commercially made sheaves. Brass is tougher than the
plastic sheave yet still easy to cut and finish. Stainless rod is almost
as easy to find, and corrosion resistant, at the cost of more hacksaw
effort.
Strop: Three strand rope is what's needed - making grommets
from modern braided line is a rather specialised activity. If you really
really want to go that way I'd point you in the direction of
Brion Toss Yacht Rigging in Port
Townsend - they run courses and sell instructional materials.
Natural fibre rope is difficult to find in small sizes of good
quality. Most of what is available is Sisal or Manila, of dubious
manufacture.
That leaves us with synthetics. Dacron is the obvious choice - it is
resistant to the marine environment, holds up well to UV radiation,
stretches very little, and is fairly readily available from sailmakers
suppliers
or chandlers. Nylon 3 strand could work, although it is stretchy. An ideal
strop stretches not at all, since excessive stretch could allow the shell
of the block to pop out of the loop of the strop under strain. Most
polypropylene breaks down rather quickly from UV damage, although there
are UV stabilised products out there if you can find them.
Riveting: Silicon Bronze ring nails are one possibility.
These are tough enough to do the job, but not so tough that they'll
destroy a carbide tip if you accidentally hit one with a router or saw.
Another option is copper nails and roves. I've seen blocks assembled with
threaded brass rod run through pre-drilled holes - if I was trying that
I'd run a steel rod through first to chase a thread.
Glue: Probably most Type II waterproof adhesives would work
adequately. I use ProBond polyurethane and the resulting glue lines are
stronger than the timber, even on fairly oily woods. If I was mixing epoxy
for another job I might use that instead.
The tools:
If you have patience, these blocks require hardly any tools - a
practical minimum would be; drill, hand saw(s), rasps (round, flat),
clamps and sandpaper. In the method explained below, I'll describe what I
used and suggest alternatives. If you have access to any of the following
they'll speed things up, but none of the fancy stuff is strictly
necessary.
Router with roundover and corebox bits
Bandsaw
Tablesaw
Drill or drill press with bits and holesaw
Microplane rasps
Belt sander
The method:
They're your blocks - the dimensions of the various parts are
inter-related, but they are up to you.
Start by deciding your sheave size: What size of line will the block
be turning? What size of sheave material is easily available? If sheave
making turns out to be less fun than you expected, can you get a
substitute commercial sheave which will fit? (amongst others, Harken and
Ronstan both list
sheaves). If you think you are likely to go the commercial sheave route, I
suggest obtaining some sample sheaves before you make the block shells -
dimensions in catalogues can be distressingly 'approximate'.
 Your
sheave stock should be a bit thicker than the diameter of line you will be
using, to leave a 'rim' around the periphery of the sheave. Quarter inch
(6.5mm) diameter line suggests 5/16" sheave stock, but 3/8" will work
fine, and even half inch won't look too terrible. Within reason, a larger
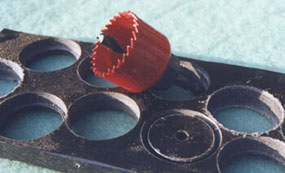
diameter sheave will turn more easily. Most hole saw mandrels use quarter
inch pilot drills. Once you have a pile of sheave blanks cut out you might
want to run a 17/64ths drill through the centre holes to ensure they spin
freely on the quarter inch pin. Your
sheave stock should be a bit thicker than the diameter of line you will be
using, to leave a 'rim' around the periphery of the sheave. Quarter inch
(6.5mm) diameter line suggests 5/16" sheave stock, but 3/8" will work
fine, and even half inch won't look too terrible. Within reason, a larger
diameter sheave will turn more easily. Most hole saw mandrels use quarter
inch pilot drills. Once you have a pile of sheave blanks cut out you might
want to run a 17/64ths drill through the centre holes to ensure they spin
freely on the quarter inch pin.
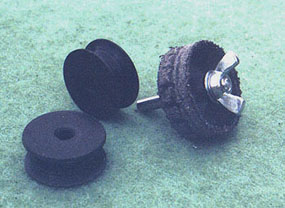 Sheaves,
before and after. The finished ones are inch and an eighth in diameter. Sheaves,
before and after. The finished ones are inch and an eighth in diameter.
With the head sawn off, a 1/4 inch bolt makes a simple mandrel for
turning the groove into the sheaves. Once mounted in the chuck of a drill
press (or of a well-clamped down power drill), the wing nut on the mandrel
allows the finished sheave to be exchanged for another blank - the process
of cutting the groove doesn't take long.
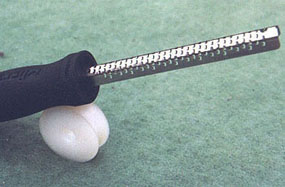 For
cutting the grooves, I use a small round
Microplane
rasp - these things are great. A bit like razor sharp cheese graters, they
cut where rasps abrade, leaving smooth finish. With the blank turning
slowly, gently present the rasp to the edge of the blank. A very slight
rolling movement of the rasp will produce huge volumes of paper-thin
plastic shavings, and in no time you will be on to the next sheave. For
cutting the grooves, I use a small round
Microplane
rasp - these things are great. A bit like razor sharp cheese graters, they
cut where rasps abrade, leaving smooth finish. With the blank turning
slowly, gently present the rasp to the edge of the blank. A very slight
rolling movement of the rasp will produce huge volumes of paper-thin
plastic shavings, and in no time you will be on to the next sheave.
Turning directly on the pin, UHMW plastic sheaves spin quite freely.
If you anticipate heavy loads, Oil impregnated sintered bronze bushings
are available in convenient sizes. After opening out the hole in the
centre of the sheave to half an inch diameter or more, it is easy to press
in a sleeve. Try your local bearing shop.
Now the woodwork starts: You are going to make four strips - two big
ones for the sides of the block (the 'cheeks') and two strips to form the
top and bottom of the 'middle third'. The four strips will all be the same
length. How long? How many blocks are you making? Multiply the number of
blocks by the width of the cheeks to get the overall length. Don't forget
to allow for the saw kerf you will lose when you sever the blocks from the
mother-strip.
Add 1/16" clearance to the measured thickness of your sheave
material, and rip to width the strips for the top and bottom of the centre
section. Watch grain alignment here.
Optionally, cut the top strip deeper, and rout a cove inside face of
top
Rip both centre section strips to height.
Cut cheek strips, checking that the long axis of the block falls
cross-grain - the simplest way to get this right is to imagine you were
going to use a hatchet to split the wood for kindling - you want to make
sure that the strain on the pin is not in the same direction as your
hatchet blow would fall.
 Align
the strips, glue and clamp. If you are doing lots of these glue-ups, it
might be worth making a spacer strip from UHMW or another 'unglue-able'
plastic. The spacer strip fits into the glueup in the space which will
later be occupied by the sheaves, and makes alignment a breeze. Align
the strips, glue and clamp. If you are doing lots of these glue-ups, it
might be worth making a spacer strip from UHMW or another 'unglue-able'
plastic. The spacer strip fits into the glueup in the space which will
later be occupied by the sheaves, and makes alignment a breeze.
Once the glue has set, clean up the squeeze-out. Next, saw block
sized chunks off the assembled strips. Excess glue inside the shells
blanks can be cleaned up at this stage with a chisel or scraper.
Next, drill for pin and rivets. If you have a drill press, a simple
jig will speed up this process, and assure a degree of uniformity. All
that I use is a piece of scrap ply with two scrap wood 'fences' pinned on
to it at right angles.
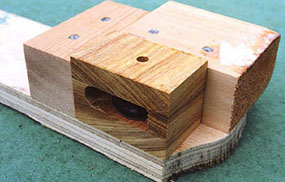 The
fences hold the block-to-be in the right position for the centre (pin)
hole to fall under the bit. Make sure you know which end of your
block-blank is the top - the pin hole is not usually in the centre of the
shell! If you will be riveting your shells drill all your pin-holes first.
Next, reposition the jig placing the riveting hole locations under the
bit. Turn the shell over, and end for end, to drill the four rivet holes.
In the absence of a drill press this can all be done with a hand drill,
but take care to ensure that the pin hole is absolutely square to the
block. Any major misalignment of the pin will result in a block inclined
to jam its sheave. If things get really squint you might not even be able
to fit the sheave. The
fences hold the block-to-be in the right position for the centre (pin)
hole to fall under the bit. Make sure you know which end of your
block-blank is the top - the pin hole is not usually in the centre of the
shell! If you will be riveting your shells drill all your pin-holes first.
Next, reposition the jig placing the riveting hole locations under the
bit. Turn the shell over, and end for end, to drill the four rivet holes.
In the absence of a drill press this can all be done with a hand drill,
but take care to ensure that the pin hole is absolutely square to the
block. Any major misalignment of the pin will result in a block inclined
to jam its sheave. If things get really squint you might not even be able
to fit the sheave.
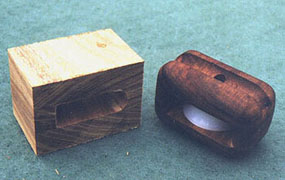
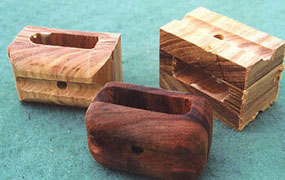 It
doesn't take long to get from a blank to a finished shell. Top right is a
blank with the groove machined for the rope strop. Top left is the same
size of blank having had its corners rounded over. Front centre is an
identical shell having been sanded to final shape, and with a first coat
of oil applied. It
doesn't take long to get from a blank to a finished shell. Top right is a
blank with the groove machined for the rope strop. Top left is the same
size of blank having had its corners rounded over. Front centre is an
identical shell having been sanded to final shape, and with a first coat
of oil applied.
A table mounted router with a fence, turning a 'core box' bit will
make short work of cutting a cove along the long axis of the block. This
cove does not need to be very deep - its purpose is to provide a recess
for the rope strop. Even with small blocks, where the strop material may
be 3/8" or less, a half inch bit will work fine; just cut a shallower
cove.
If the router is not available, use the round rasp to cut a notch
into the block where each end of the cove would fall. This is the only
part of the recess which is really doing much work in keeping the strop
on. The old blocks were done that way, and
there is an argument to be made for leaving extra wood around the centre
of the shell, giving the pin more bury.
Changing the core box bit for a roundover, pass the shell across the
table every which way, removing all external corners. A bandsaw can help
here if the router isn't available, and can be used to give a pleasing
profile to wide cheeked blocks regardless. A coping saw will do a job,
though slowly. Otherwise, a few passes with the block plane followed by
some judicious rasping will bring you to the same place.
 Using
a rasp, round the bottom of the score where the rope reeved through the
block might otherwise rub. This is easier to do than to describe. Using
a rasp, round the bottom of the score where the rope reeved through the
block might otherwise rub. This is easier to do than to describe.
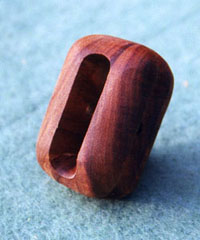
The finished shape of the area needing attention can be seen in this
shell. Compare the shape of the finished shell with the routed blank shown
above.
If you have decided to rivet your
shells, this might be the time to do it. Particularly in dense hardwoods I
find it easier to drive the nails while the shell is still a square-sided
blank, but that commits you to cutting down the nails as you shape the
block.
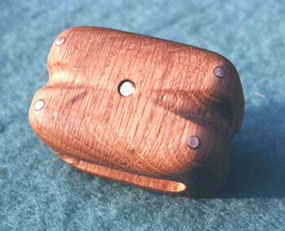 Even
with generous pre-drilled holes, driving 8d bronze nails into oak proved
so trying that I ended up using the bench vise to press them into place.
Drive two nails from either side of the shell, on diagonals, so that both
ends of the shell have a nail through them in each direction. This shell
is white oak (although the oil finish looks red). Having been worked down
from square with hand tools, it shows the traditional form of the groove
to hold the strop. Even
with generous pre-drilled holes, driving 8d bronze nails into oak proved
so trying that I ended up using the bench vise to press them into place.
Drive two nails from either side of the shell, on diagonals, so that both
ends of the shell have a nail through them in each direction. This shell
is white oak (although the oil finish looks red). Having been worked down
from square with hand tools, it shows the traditional form of the groove
to hold the strop.
 Using
a sharp chisel, clean up any excess glue inside the shell. Sand and finish
the wood to taste. I used UV stabilised Tung oil - I like oil finishes -
but spar varnish would work just fine. The quarter inch diameter brass or
stainless rod for the pin can now be cut to length and gently rounded at
the ends to remove burrs. Pin length will depend on your shell dimensions
- the pin should be just short enough to lie flush with the wood, allowing
the rope strop to settle in the cove. Using
a sharp chisel, clean up any excess glue inside the shell. Sand and finish
the wood to taste. I used UV stabilised Tung oil - I like oil finishes -
but spar varnish would work just fine. The quarter inch diameter brass or
stainless rod for the pin can now be cut to length and gently rounded at
the ends to remove burrs. Pin length will depend on your shell dimensions
- the pin should be just short enough to lie flush with the wood, allowing
the rope strop to settle in the cove.
Now you can assemble pin, sheave and shell, ready for the ropework.
Making the little rope doughnuts called grommets can be easy and
enjoyable, or it can be deeply frustrating. Any decent book on ropework or
marlinespike work will give details on making grommets. I'd recommend The
Complete Rigger's Apprentice by Brion Toss - much more than knots and
splices. Harder to find, but a great introduction to rope work is Floris
Hin's 'The colour book of Knots'.
If you have never before made grommets from three strand rope I
would suggest getting hold of a few feet of manila - when unwound, each of
the strands retains the spiral shape it had when part of the rope - it
'holds its lay' - which makes it gratifyingly easy to lay up into a
grommet. Make a few to get the hang of things, then keep them around to
remind yourself that you can do it. You can always use them as
quoits.
Both Dacron and Nylon are very soft when unlaid, and can be
frustrating 'grommetees' One solution is to use a 'clue', laying the
grommet strand into the place of each of the three strands in turn.
Another possibility is to use a temporary stiffening agent to help the
Dacron hold its lay. I've used cheap hair gel with considerable success
for this purpose (what else would I use it for?).
In the interests of completeness, here's a basic version of grommet
making instructions....
First, work out what length of rope you need. Pass the rope round
the shell of the block, and add an allowance for the thimble eye. Take the
resulting measurement, and multiply it by four. Cut your rope to length,
and whip or tape the ends of the three strands to prevent them unravelling.
 Second,
gently unwind one of the three strands from around the other two.
Synthetic rope repays gentleness - the less you manhandle the strand the
better it will retain the spiral shape it had while part of the rope. Second,
gently unwind one of the three strands from around the other two.
Synthetic rope repays gentleness - the less you manhandle the strand the
better it will retain the spiral shape it had while part of the rope.
Now, take the single strand and starting in the middle, lay it back
against itself to form a loop of the 'block and eye' dimension you
originally measured. Carefully wrap the strand around itself, re-creating
the spiral form of the original rope.
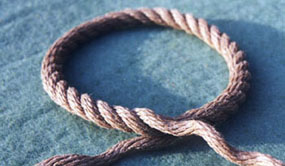 Working
out towards each end you will eventually have a three strand loop of rope,
with two single strand tails. That's your grommet. Working
out towards each end you will eventually have a three strand loop of rope,
with two single strand tails. That's your grommet.
Finishing a grommet is done like a long splice - Split each tail
into two bundles of yarns. Tie one half of each tail together in an
overhand knot and pull it tight enough to drop the half-strands down into
the middle of the rope. Work the other halves into the rope over one
strand then under the next, and so on.
Other stropping options include webbing of the sort used for
mountaineering equipment, and making 'selvagees' - essentially multiple
loops of thinner cord such as small braid. The Ashley Book of Knots covers
stropping variants in some detail.
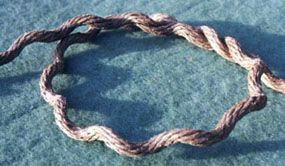
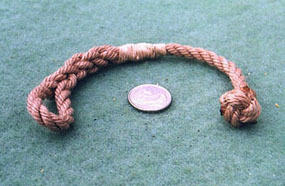
 This
strop has no thimble; Instead, the eye has been served over with heavy
waxed twine. Once the size of the eye has been established, and before the
strop is closed round the block, a tight spiral winding of twine is worked
around the portion of the rope which will form the eye. The ends of the
twine can be finished by tucking then under the last few turns, or by
stitching through with a sail needle. This
strop has no thimble; Instead, the eye has been served over with heavy
waxed twine. Once the size of the eye has been established, and before the
strop is closed round the block, a tight spiral winding of twine is worked
around the portion of the rope which will form the eye. The ends of the
twine can be finished by tucking then under the last few turns, or by
stitching through with a sail needle.
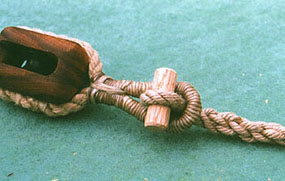
 Closing
the grommet around the shell of the block is done by with a seizing. Place
the rope around the shell and start the seizing about two rope diameters
above the top of the block - the seizing is worked towards the block,
drawing the rope together and pinching the shell in place. Closing
the grommet around the shell of the block is done by with a seizing. Place
the rope around the shell and start the seizing about two rope diameters
above the top of the block - the seizing is worked towards the block,
drawing the rope together and pinching the shell in place.
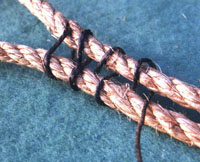
This is a racking seizing, with the twine left loose to show more
clearly the 'over and under' figure eight path taken.
 In
a real seizing, each turn of the twine is pulled up tight before the next
is put in. If you have never seized rope together before, be prepared to
be surprised as to just how much strength a little bit of twine can add to
the whole. The sample in the pictures is manila seized with tarred hemp,
and it gets very rigid by the end of the process. In
a real seizing, each turn of the twine is pulled up tight before the next
is put in. If you have never seized rope together before, be prepared to
be surprised as to just how much strength a little bit of twine can add to
the whole. The sample in the pictures is manila seized with tarred hemp,
and it gets very rigid by the end of the process.
 Once
the racking turns are completed, work your way back down (up?) the seizing
, wrapping a second layer of twine over the first, with each turn sitting
in the groove between turns on the first layer. Unlike the racking turns,
these 'riding turns' do not weave in and out between the two ropes.
Instead, they are simply wrapped round the whole bundle. They do not need
to be hauled as tight as the racking turns - hand tight is fine. Once
the racking turns are completed, work your way back down (up?) the seizing
, wrapping a second layer of twine over the first, with each turn sitting
in the groove between turns on the first layer. Unlike the racking turns,
these 'riding turns' do not weave in and out between the two ropes.
Instead, they are simply wrapped round the whole bundle. They do not need
to be hauled as tight as the racking turns - hand tight is fine.
For the size of rope shown, this seizing is a bit short. Ideally the
finished seizing should be about as long as it is wide.
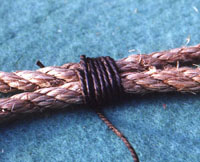
 With
the racking and riding turns in place, a couple of frapping turns are
taken around the seizing, between the ropes as shown. To finish off, the
start and end of the twine can be square knotted together. Since I often
bury the start of the twine, I usually finish off by leading the end of
the twine round the frapping in a spiral, drawing all tight before cutting
off the tail. With
the racking and riding turns in place, a couple of frapping turns are
taken around the seizing, between the ropes as shown. To finish off, the
start and end of the twine can be square knotted together. Since I often
bury the start of the twine, I usually finish off by leading the end of
the twine round the frapping in a spiral, drawing all tight before cutting
off the tail.
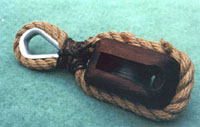
Galvanised or stainless thimbles can be found anywhere that sells
wire rope - most big hardware stores. Seized into the grommet above the
block they provide a hard point to connect a
shackle. With a larger grommet, a second thimble can be seized in at the
bottom end of the block to receive the standing part in a purchase.
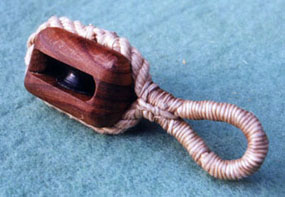
 For
a block which will be attached to a spar, a longer version of the becket
shown here can be worked up, then seized around the shell in place of the
grommet. The knob and eye at the top of the block pass around the spar,
allowing the block to be 'buttoned' in place. For
a block which will be attached to a spar, a longer version of the becket
shown here can be worked up, then seized around the shell in place of the
grommet. The knob and eye at the top of the block pass around the spar,
allowing the block to be 'buttoned' in place.
Another grommet-free method is to work an eyesplice into the end of
a line. Passing round the shell of the block instead of the grommet, the
eye is seized into place.
 Instead
of using thimbles and shackles to attach this block, a small wooden toggle
has been seized into the end of a line. Using a served-over soft eye
formed from the strop, the block can be buttoned onto the end of the line.
Low-tech, but effective. Instead
of using thimbles and shackles to attach this block, a small wooden toggle
has been seized into the end of a line. Using a served-over soft eye
formed from the strop, the block can be buttoned onto the end of the line.
Low-tech, but effective.
 I've
had fun making these little blocks. They use so little material that I can
justify using woods normally beyond my pocket. I've
had fun making these little blocks. They use so little material that I can
justify using woods normally beyond my pocket.
The hand shaping can be done with a small rasp and a scrap of
sandpaper, allowing the work-in-progress to be carried around in a pocket.
Lunch-breaks can become boat-breaks. Enjoy! |

