|
Below is the building saga of "Lilly", my first
home-built boat.
She is built from the the "Toto"
double paddle canoe design by
Jim Michalak.
Jim calls it a Canoe, I call it a Kayak. I started a little late in the
game with the photos, but I believe they'll give the gist of how she goes
together.
Oh yeah, "How did you come up with 'Lilly' for name?",
you ask. Well, there is a beautiful stand of Day Lilies out in front of
our old barn. They really look lovely as they bloom this time of the year.
This boat has really started "blooming" about the same time, so I thought
it was good fit.
To see what it is going to look like when it is
finished,
Go Here. I personally don't think the first boat you see is the
coolest looking one, so be sure and scroll down a bit to see the others...
:-)
(click thumbnails for larger view)
Construction |
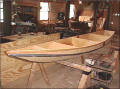 |
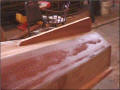
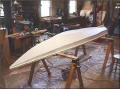
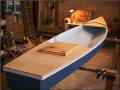
At this point she is all stitched up with
zip-ties and the seams are taped with Duct tape. Getting ready to do the
fillets and glass tape the interior seams. |
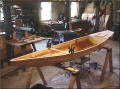 |
Temporary forms are removed and the
interior seams are all filleted and taped. I made the fillets with Epoxy
thickened with pine wood flour. This was much easier than I thought it
would be but it got a little tedious. I tried the venerable "pastry-bag"
method where you put the putty in a ziplock bag and cut out a corner, but
this didn't work as easily as I thought it would. In retrospect I probably
had used a little too much flour and got the mixture a little too thick..
I ended up applying most of the fillets with tounge-depressors (or big
popcicle sticks, which ever you'd like to call them :-) )
You can see in the pic that I've already cut out the back deck and
hatch coaming... I put a temporary brace in up near the bow to keep the
sides from springing in too much till I get the bow deck on... |
 |
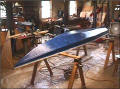
This shot is after I got the outside
fillets done, the zip-ties cut off, the seams taped with 3" fiberglass
tape, and the whole hull covered in 5oz fiberglass cloth and epoxy. I
forgot to mention that for the whole project I I've been using epoxy and
fiberglass from Raka in Florida. Their stuff is a breeze to use! Up till
now, whenever I've done any fiberglass work it has been with the cheapest
polyester resin I could find but I'm an epoxy convert now! Its much easier
to mix and time, and its no where near as funky smelling as polyester.
Unfortunately it is a good bit more expensive than polyester, but I'm
learning to do a little at a time and not waste it. All in all, I think
for stich-n-glue it is well worth the price. |
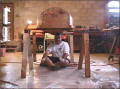 |
A friend at work called these my "head
shots". My wife came in as I was filling in some spots I'd missed with
putty. She loved the scene and took a few shots... |
 |
The Skeg! I cut my skeg out of a piece of
redwood that I had laying around. At this point it is attached with epoxy
and stainless screws. I have an epoxy putty fillet at the joints where it
meets the hull. I'll probably put a layer of fiberglass on it for abrasion
resistance, but I've toyed with the idea of putting a strip of copper on
the edge. |
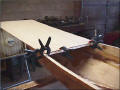 |
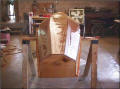
Fitting and cutting out the bow deck and
coaming. The bow deck was a breeze, lay out a piece of plywood, mark it
with a pencil and cut it out. The coaming was a little more aggravating... |
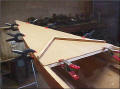 |
The angle at the front it 45 degrees. I
aligned it on the centerline, made pencil marks on the deck so I'd
remember later where I'd placed it, and also made pencil marks where it
overlapped the gunwales so they'd be flush when I cut them off. |
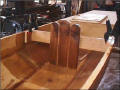 |
The seatback. Jim says that for proper
trim you should sit about where the side and bilge panels are scarfed.
That's cool and all, but I believe it would give you one heck of a
backache if you paddled too long there without something to rest your back
on. (The original design doesn't have a seatback). To fix this little
problem, I put together a removable seatback.
I don't know if it is universal or not, but all the seatbacks on all
the chairs laying around my barn seem to have about the same angle of 8
degrees between the seat and the back, so 8 degrees is what I used.
The long horizontal board slides down into slots on each side of the
boat. The slots are made by gluing two cleats to each side both slanted
back at 8 degrees. I also cut the bottom ends of the vertical pieces at 8
degrees as well so they'd sit flat on the bottom. |
 |
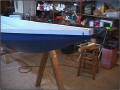
Primer on the whole boat and and one coat
on the bottom. I used Behr primer and 100% Acrylic Latex Exterior house
paint in a semi-gloss finish. I learned an important lesson here... |
 |
Dark colors show surface defects much more
than light colors. Cest la vie though, Lilly is going to have a
"work-boat" finish anyway since I don't have a lot of patience for sanding
:-) |
 |
All masked up and ready for the interior
and gunwale paint. |
 |
While I was waiting on the interior to dry
I made a bow handle out of a small piece of rake handle and a little rope.
This handle will make it easier for two people to carry her and it also
doubles as a handy cleat to which to tie a painter. |
 |
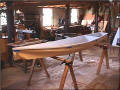
Paint is all dry and I have my decks fitted
and sanded, but not permanently attached. I'm going to give them a couple
of coats of spar varnish before I attach them with glue and bronze boat
nails. |
|
Launch Day |
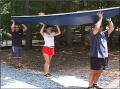 |
My son Thomas, my daughter Amanda, and I
ease her off the top of the Kay's car. |
 |
Thomas and I carry her down to the water.
You can't see it, but I'm using the clever bow handle :-) I'm going to
have to add one the stern as well. Carrying her by the gunwales is a
little rough on your forearms... |
 |
My wife Kay prepares to christen her with a
bottle of premium Corona Cerveza Mas Fina. |
 |
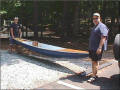
She's raring to go, but Thomas holds her
back long enough for a passenger to board. |
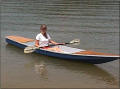 |
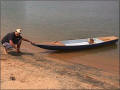
Everyone gets a turn gets a turn putting
her through her paces... Here's Amanda |
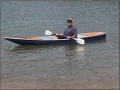 |
And Barry |
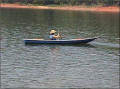 |
And Kay |
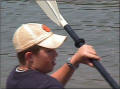 |
Thomas concentrating on his technique. |
