Length: 12"
Beam: 5'3"
Mast Height: 16'
Rig: Sprit rig with curved boom (leg o' mutton)
https://www.shellboats.com/sbboats.html#swifty
Shell Boats: www.shellboats.com
During the summer of 2000 I spent a week camping at a large lake in the
Oregon Cascade Mountains. Over that week I saw several small sailboats on
the lake. The guys in those sailboats were having a lot more fun than I
was sitting on the beach reading and soaking up the sun! By the time the
week was over I had decided to get a small daysailer.
 It did not take too long for me to realize that the boat I really wanted
was not available to purchase so I began to look at boat plans on the
internet. I narrowed my search to the more classic style of sailboat. My
boat would need to be a sailboat first and useable with oars if the wind
died. I did not want a motor. I have owned several small fishing boats so
I knew that a boat in the 12' - 14' range was my target size range. A 12'
boat on a trailer would fit in my garage.
It did not take too long for me to realize that the boat I really wanted
was not available to purchase so I began to look at boat plans on the
internet. I narrowed my search to the more classic style of sailboat. My
boat would need to be a sailboat first and useable with oars if the wind
died. I did not want a motor. I have owned several small fishing boats so
I knew that a boat in the 12' - 14' range was my target size range. A 12'
boat on a trailer would fit in my garage.
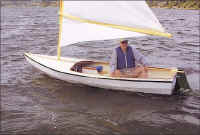
I also wanted a boat I could sit "in" not "on". The 5'3" beam on the
Swifty 12 caught my eye as well as the classic lines. It would not be too
tender and would hold my 6'1" frame. I did worry a bit that the wide beam
might affect how the boat would row but that fear was groundless. It is no
rowing shell but it does row easily with the rockered bottom. Some days
I'll just go for a row and hope the wind comes up.
 I liked Fred Shell's approach to boats, design and construction. You can
read about it at the Shell Boats Website
but I encourage you to order his video if you are thinking about building
a Shell Boat. He runs through the construction of most of his designs so
you can really see how they go together, the size and how they look. He
also has videos for specific models if you are building from plans.
I liked Fred Shell's approach to boats, design and construction. You can
read about it at the Shell Boats Website
but I encourage you to order his video if you are thinking about building
a Shell Boat. He runs through the construction of most of his designs so
you can really see how they go together, the size and how they look. He
also has videos for specific models if you are building from plans.
Fred Shell says his boats' "roots go back to the early American skiffs,
Dutch vlets and the Norwegian holmsbupram of centuries ago. The boats are
designed by first building a prototype - by eye, as the Norwegians have
built the holmsbupram for centuries. No detailed plans, offsets or molds
are used. The prototype is meticulously hand crafted and temporarily
assembled without glue. If anything doesn't look right it is taken apart
and redone". Once Fred is satisfied with the design the plans and patterns
are based on the prototype.
 My choice of a Shell Boat to meet my desire for a classic looking sailboat
was confirmed one day last summer while launching my boat, when another
sailor asked "is that an old boat or a new boat made to look old?"
My choice of a Shell Boat to meet my desire for a classic looking sailboat
was confirmed one day last summer while launching my boat, when another
sailor asked "is that an old boat or a new boat made to look old?"
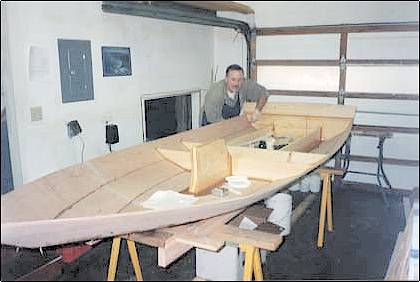
Shell boats offers finished boats, plans and kits. After I decided to
build the Swifty 12 I chose to go for the kit. Even though I live in
Portland Oregon where marine plywood, supplies and epoxy are stocked at
local stores I liked the odds of my success with the kit. I had built a
small Folbot kayak years ago but had a firm case of nerves about starting
this boat from scratch. I also picked the kit since I live in an old house
with a small one car garage. I have only hand tools and no big woodshop.
 Of course now that I have built the Swifty 12 I am looking for the next
boat to build and will most likely do it from plans. I feel that building
the kit, after watching Fred's video many times and talking to him on the
phone more than once, is a lot like taking a boat building class. Fred was
very generous to me with his time on the phone and clearly enjoys what he
does.
Of course now that I have built the Swifty 12 I am looking for the next
boat to build and will most likely do it from plans. I feel that building
the kit, after watching Fred's video many times and talking to him on the
phone more than once, is a lot like taking a boat building class. Fred was
very generous to me with his time on the phone and clearly enjoys what he
does.
Most of his boats are glued lapstrake construction built on a jig
right-side up. Simple clean lines, with a nice shear. I don't think you
can find a better value in a boat kit since these kits come with the
spruce mast and boom and a nice Dacron sail in your choice of color(s) -
even tanbark for a small extra fee.
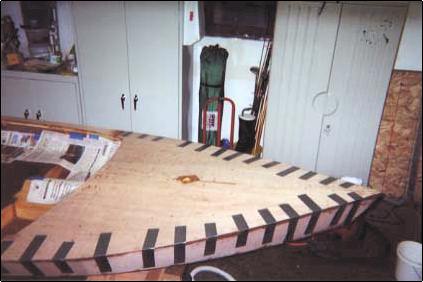
The materials are all first rate. The fasteners are bronze or stainless.
All solid wood is spruce (the deck support beams may be pine or spruce).
The plywood is British marine grade, very nice 7 ply 3/8" for most of the
hull and seat tops complete with the grade stamp. The shear planks are 5
ply 1/4" as are the coaming pieces and deck surface pieces.
 While you don't need any power tools to build this kit I would highly
recommend a good random orbital sander (I like the Porter Cable), a good
cordless drill/screwdriver with two batteries, and a shop vac to hook up
to the sander. A good block plane (Stanley) will come in handy at several
points during the construction too.
While you don't need any power tools to build this kit I would highly
recommend a good random orbital sander (I like the Porter Cable), a good
cordless drill/screwdriver with two batteries, and a shop vac to hook up
to the sander. A good block plane (Stanley) will come in handy at several
points during the construction too.
Be sure to read the instructions over (and over) and watch the video
section on the boat you order before starting. The video helped clear up
some of the building steps for me since the instructions were pretty
basic. The thing that helped me the most during this project was taking
the time to plan ahead. Even though the instructions and video laid out
the process for me I found that sitting down with a note pad and a cup of
coffee to plan out the sequence of the next operation really helped my
building (and learning) process. By running it through in my head first I
was better able to see potential trouble or maybe even an easier way to do
something.
 If
you have not worked with epoxy then by all means check out the info on the
various websites such as System 3 (what I used) and West System. Both
brands offer really great books on using their stuff. I also read
Sam Devlin's book. If
you have not worked with epoxy then by all means check out the info on the
various websites such as System 3 (what I used) and West System. Both
brands offer really great books on using their stuff. I also read
Sam Devlin's book.
I practiced with epoxy coating and gluing with scraps of wood and plywood
while I was waiting for my kit to arrive. It was worth the time. I fit an
old cooler with a thermostat hooked to a 25 watt light bulb to keep my
epoxy warm enough to pump. The pumps make measuring quick and accurate.
I did several extra steps that added time and cost to building my Swifty
12 that went beyond the kit instructions. These include multiple coats of
epoxy (3 or more) to seal all surfaces, fiberglassing the interior stem
joint, fiberglassing the mast step to the bottom, brass half oval on keel
/ rub strip and adding small knees under the side decks. None of these
steps are required and probably make no difference at all to the boat.
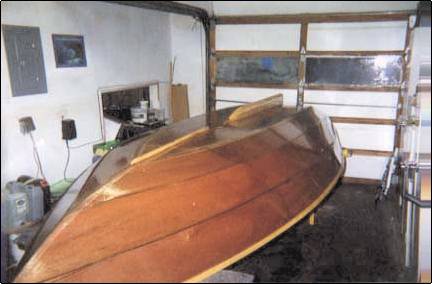
Part of building a boat is to make it the way you want to. In any case the
knees look great and they gave me a reason to use my new bevel gauge. I
used Interlux 2-part epoxy primer and Interlux Brightsides Polyurethane to
paint the boat rather than cheaper paint and have been very happy with it.
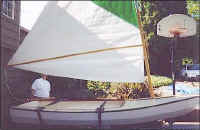 The spruce mast is a clever two piece design. The hinge design worked
flawlessly sailing last season and lets you store the mast in the boat.
The spruce mast is a clever two piece design. The hinge design worked
flawlessly sailing last season and lets you store the mast in the boat.
I launched my boat on 5/27/01 after 6 months and 150 hours. My extra steps
added considerable time to the building process. Fred says as designed a
novice should be able to build a Swifty 12 in about 60 hours. I have at
least 60 hours in epoxy coating, sanding and finishing! I now joke about
the "zen of sanding".
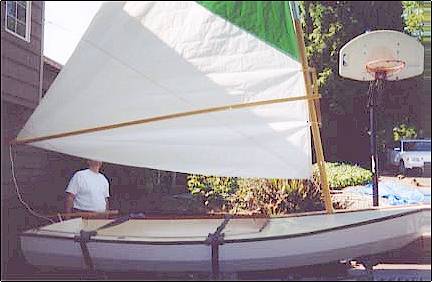
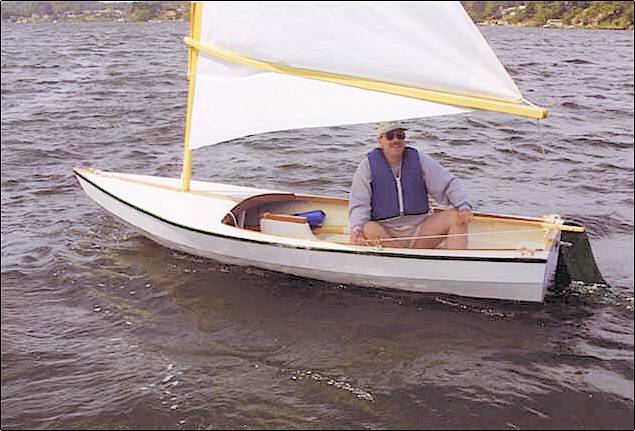
I named her "Surprise". Sailing her was my first real experience in a
small sailboat. I sailed Surprise over 60 hours last year and did not
capsize though I came close a couple of times early on. The wide beam also
means that you can climb in over the side and not dump the boat. I did
some practice drills and was delighted with how easy it was to get back
into the boat. This let me sail her harder knowing I could actually get
back aboard! She goes to windward very nicely - in fact amazingly close
and is not tender at all with the 5'3" beam. Sails upright and takes a lot
of wind to get her heeled over. She gets up on a plane in about 10 knots
of wind.
 It took me a while to work out the main sheet rigging - likely due to my
inexperience in small sailboats. The stock method worked fine but I wanted
more help holding on to the sheet in stronger winds. I ended up adding a
rope traveler across the stern tied between the two aft cleats. I hung a
small block from the end of the boom then ran the main sheet from another
block (with a becket) that is connected to the rope traveler. The main
sheet now runs from the becket at the traveler up through the block at the
end of the boom and back down through the block at the traveler then to my
hand. I can wrap it a turn or two around the tiller to "one hand" the boat
but am still able to let go for gusts. By using carabiners I am able to
rig/unrig the main sheet in seconds. The double block system gives me the
leverage I felt I needed going down wind with the big main sail (65 sf).
It took me a while to work out the main sheet rigging - likely due to my
inexperience in small sailboats. The stock method worked fine but I wanted
more help holding on to the sheet in stronger winds. I ended up adding a
rope traveler across the stern tied between the two aft cleats. I hung a
small block from the end of the boom then ran the main sheet from another
block (with a becket) that is connected to the rope traveler. The main
sheet now runs from the becket at the traveler up through the block at the
end of the boom and back down through the block at the traveler then to my
hand. I can wrap it a turn or two around the tiller to "one hand" the boat
but am still able to let go for gusts. By using carabiners I am able to
rig/unrig the main sheet in seconds. The double block system gives me the
leverage I felt I needed going down wind with the big main sail (65 sf).
The boat just tears along on a reach. The keel helps her track straight
and the big barn door style rudder means beaching is simply a matter of
pulling up the daggerboard.
 There are no reef points on the single large main sail but the latest
Wooden Boat Magazine (#165)does have an article on a way to reef a sprit
rig. Fred says "just pull out the boom, roll up the sail on the mast (no
stays) and sail it loose footed." Simple, practical and elegant - like
Fred's boats. (I secure the mast to the deck with a short line tied to a
strap eye which would also serve to prevent the sail from unwinding like a
window shade if reefed this way.)
There are no reef points on the single large main sail but the latest
Wooden Boat Magazine (#165)does have an article on a way to reef a sprit
rig. Fred says "just pull out the boom, roll up the sail on the mast (no
stays) and sail it loose footed." Simple, practical and elegant - like
Fred's boats. (I secure the mast to the deck with a short line tied to a
strap eye which would also serve to prevent the sail from unwinding like a
window shade if reefed this way.)
I am now firmly a wooden boat fan. Building and sailing my Swifty 12 has
been pure enjoyment. Last summer I was back at the lake and this time I
was the guy with a sailboat!
If you want to see my Swifty 12 construction in more detail please visit
my website at:
www.hevanet.com/kg7pv/Swifty12.html
You can also email me. I love to talk about my boat.
Thanks,
Steve Miller kg7pv@hevanet.com
Portland, OR

CLOSE UPS TAKEN JUST BEFORE LAUNCH: Click on image.


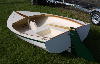

Close up photos by Stephen Cridland, Photographer - Portland, OR
|