Many home boat builders are producing simple functional sails from
white and canvas-colored polytarp simply through rounding the luff and
(sometimes) placing an 18"-24" long by 3" wide dart in the tack. For most
Bermuda, Marconi, and Leg o' Mutton sails, this simple technique allows
home sail makers the advantage of an easily constructed sail that allows
them to get out on the water and put their newly built craft through its
paces.
However, a number of experienced builders, having gained respect for the
strength and low cost of the white and canvas-colored polytarp material,
are now looking for more sophisticated construction techniques that
provide more effective sail shapes from a single sheet of material. To
assist these polytarp experimenters who purchase our inexpensive
sailmaking kits,
HR Solutions/PolySails has developed two new techniques for shaping
sails. The first is a simple method for modeling sails on graph paper.
This technique allows the sailmaker to construct several models of a
one-piece sail and to achieve optimum shaping suiting the builder's
purposes prior to making the first cut in the polytarp material. The
second technique allows PolySail builders to add removable battens to
their sails easily without sewing in batten pockets. Let's begin by
exploring the modeling approach.
For the modeling
exercise you will need the following materials:
| • Sail plan |
• Sharp pencil |
| • Graph paper (preferably 17" x 11" pad) |
• Scissors |
| • Ruler (preferably 18") |
• Scotch tape |
| • (Optional) Small diameter wood
dowels to represent masts and booms |
Before constructing your PolySail, lay out your sail
plan to scale on a piece of graph paper. (See (1) below.) Include any
rounding (outward curves) or hollowing (inward curves) of the sail edges
that you plan to have in your final sail shape. Once you have your sail
outline down on the graph paper, cut the sail out around the perimeter.
Lay this master on another piece of graph paper, and mark around the edges
to make other copies. Three copies of each sail that you plan to construct
should do the trick.
By rounding the edges of your sail, you will provide
some curvature to the sail when the rounded edge is straightened against a
mast or boom. (See (2) above.) This curvature is enough for a sail to work
well in most conditions. In fact, sailors will often hoist a flatter sail
in windy or stormy conditions.
You can see the effect of rounding an edge by taping the luff of one paper
copy of your sail directly to a straight edge, such as a ruler or small
diameter dowel representing the mast. Make certain that you straighten out
the rounded edge as you tape it to the straight edge. If you have a boom
at the foot of your sail and rounding in the foot, you can also tape this
edge to a straight edge representing the boom. Again, make certain that
you straighten out the rounded edge when taping the edge to the straight
edge.
For most sailing situations, you can get more power from your sails if
they have additional depth or camber. If you want additional curvature or
depth in the body of your sail, you can place V-darts in critical
locations. (V-darts are sewn or taped overlaps or seams in the edges or
corners of the sail. For an illustration, see (3) above.)
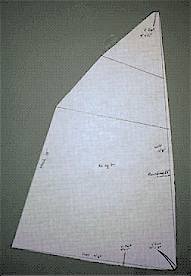
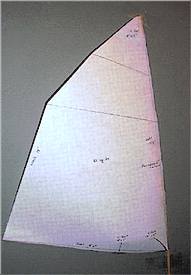
Using this method I found, for example, that the sail illustrated above (a
jib-headed sprit sail with battens of about 80 sq. ft.) would benefit from
using the following placement of V-darts and edge rounding: Start by
rounding the luff by 3" about one third of the way up from the tack with
the rounding tapering away to the tack and head. Round the foot by 2"
about one third of the way from the tack with the rounded edge tapering
away to the tack and clew. Place an 18" long x 3" wide V-dart in the tack
with the dart pointing about one-third of the way up the leech from the
clew. Curve the dart slightly so that the belly of the curve is at the top
of the dart. Next, place an 8" x 1" V-dart in the head. Add an additional
8" x 1-1/2" V-dart in the foot about a third of the distance between the
tack and clew. To help secure these taped V-darts, sew each dart
(preferred) or place a grommet through the folded material wherever you
have placed a V-dart.
For a jib, rounding and V-darts in the foot of the sail are a virtual
necessity. A V-dart in the clew is also important. A slight hollow at the
top of the leech (the edge nearest the mainmast on a jib) is also
desirable.
Using the additional copies of your sail plan, experiment with the best
locations for V-darts in your sail plan. Once you have a plan you like,
transfer these locations directly to the outline of your sail shape on
your poly tarp. Make certain that you place the V-darts in the material
prior to taping and folding over the edges.
Note that the
V-darts will shorten the lengths of your sail edges, so take this effect
into account before cutting out the final sail shape.
V-darts in edges can also slightly affect the rounding
of the edges. You should be able to see these effects in your paper model
and adjust your edge cuts in the polytarp accordingly.
Using this simple graph paper method, you can roughly determine the shape
of your PolySail before you construct it. Later, while constructing the
sail, you can place bags of mulch or lawn furniture pillows under the sail
just back from the luff to help check whether you've achieved the desired
shape you want in your sail. Usually, the deepest draft should occur about
30% to 40% into the sail as measured from the luff.
A second important technique developed by
HR Solutions/PolySails
allows polytarp sailmakers to make fully or partially battened sails
easily. After struggling to sew batten pockets into a couple of polytarp
sails, the author sought and found a batten alternative that works well on
polytarp, but is probably unsuitable for sails made from other materials.
Our answer lies in a recently-released, industrial strength rolls of
Velcro. Available in 20' x 2" rolls in white or black for less than $1.50
a foot, this Velcro product features an incredibly strong backing of
waterproof adhesive that adheres easily to polytarp. By placing a strip of
the loop material directly on the sail and a strip of hook material on a
fiberglass or wood batten, a sailmaker can create an "instant" batten.
Besides the ease with which these battens are created and attached, a
further advantage of the Velcro battens is that they can be easily removed
for rolling and storing the sails.
Velcro battens can be used to make fully battened, high aspect catamaran
sails, junk sails, batwing sails, and sharpie sails, to mention just a few
applications. On small loose-footed sails, such as the 35 sq. ft. canoe
sprit, a Velcro batten can be used to hold out the clew. For sails that
need sleeves, such as the lateen sail used by the Sunfish, the Velcro
strips might be used to create sleeves for the mast and boom in lieu of
sewing. (I haven't tried this application yet.)
Along with the modeling technique, the Velcro strips extend the
possibilities for easily-constructed polytarp sail applications for small
home-built boats. With continued experimentation, white polytarp sails
might soon offer a strong challenge to the newer synthetics as a power
source for small boats.
MAKING A V-DART IN POLYTARP SAILS

Order your polysail kit from the
Duckworks Store

|