Notes on the TakeApart Canoe
Dave Brezina
dbrezina@rcnchicago.com
5825 N Virginia Ave
Chicago, IL 60659
(773) 728-7717
Fasteners:
- 8 1/2" x 6" bolts
- 8 1/2" nuts
- 16 1/2" flat washers
- 1 lb bronze ring shank boat nails for planking/chine
- 1/2 gal. epoxy resin
- about 100 flathead screws for sheer strake
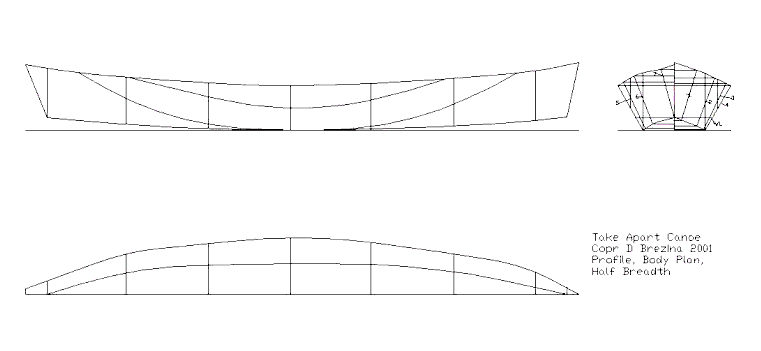
The hull shape started as two segments of different sized ellipses in plan form. This let the beam to effectively be pushed a little aft. This provides for a sharper entry and would let a paddler, rower or passenger sit farther aft. Of course, the ends were 'pointed' for double-ender, plywood construction. Ellipses were thought to give a little larger initial displacement than traditional canoes or kayaks. However, there is considerable rocker so rowing while lightly laden will be easy. Finally, the elliptical shaped bottom seems to put a good bit of rocker into the boat when the plywood sides are forced to conform and lets one make the sides straight, or nearly so, when cutting them from the plywood.
The next factor was to fit the planking so it would come from two 4' x 8' sheets of plywood. Obviously scarfing or butt blocks are one way to make a longer boat from a shorter piece of wood. But that would yield a boat or canoe some 12' to 14' long, depending on how much plywood you used for things like butt blocks, frames or bulkheads. Living on the beach (in a house that a spouse would approve of) is expensive, so cartopping or trailering would be necessary. There is also a need for storage and I already have three boats, not counting two abandoned
dinghies and one sailboat I gave away. Thus, why not make it in pieces, 'nesting' style? But in a long, narrow boat, nesting with a joint amidships would provide quite a bit of stress on that joint. Thus, the idea to make it in three sections, the midships section being longest and the other two nesting therein. The midships section could then use an entire length of 8' plywood, the bow and stern sections being formed of portions of a second sheet.
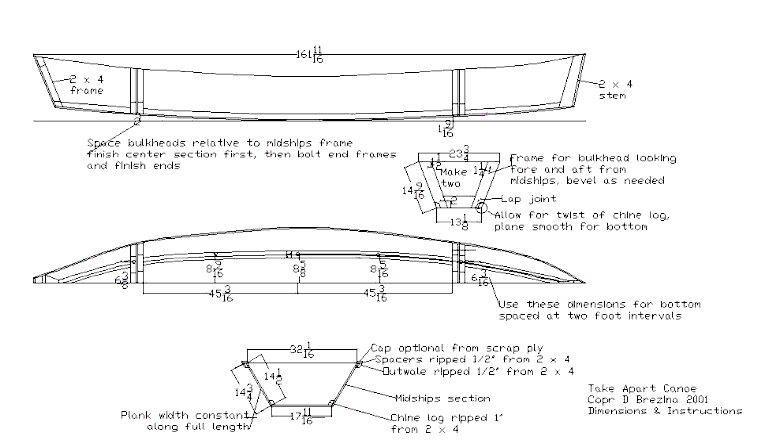
For adequate strength in joining the sections, 2 x 4s are used, as available in the specification, providing enough wood to be beveled without significant loss of fore and aft strength and enabling an easy to cut and fit lap joint at the chines. They are probably heavier than an optimal design would want, but have the above advantages. At this stage, it's an experimental boat. For seaworthiness, bulkheads are provided fore and aft in the center section. If the joint fails, you and most of your stuff are in a pram, albeit a somewhat oddly shaped pram.
Bulkheads in the fore and aft sections would require more plywood and add a little weight, but by leaving those sections with frames and by using the same size frames, the possibility exists to bolt them directly to one another and in theory have two boats for the price of one. The tiny two part dinghy is probably of too small a displacement to be of much use, but it might be fun for a couple of kids on a beach and I suppose an adult could row it and keep all the stuff in the center section, pulling it as a 'barge'. It isn't practical, but it is novel.
Make the bulkhead frames first. Check the dimensions so that they fit together as two 'sandwiches' with a midships section frame, a transom and then the fore or aft section frame. Drill through one sandwich for four bolts. Space them inboard far enough to allow for
beveling. Then take apart the one sandwich, switch the parts with the other sandwich and use the bolt holes as pilot holes to drill the second set.
Use a midships frame and the bulkheads to build the center section first, then bolt on the forward and aft frames and build up the fore and aft sections next.
Layout the individual parts on the two plywood sheets. So long as the bottom edge of the hull side is the same length as the side of the bottom it mates with, the rest will fall pretty much in position when the hull(s) are assembled. The spacing between the bulkheads should fit on a single sheet of 4' x 8' plywood. Mark a centerline on the ply, Rip the sides from the edges, with 14 3/4" inside the saw kerf and lay out the bottom on the centerline, using the marked dimensions spaced at two foot intervals. Cut the bulkheads from the second sheet of plywood with the beam of the boat corresponding to the 4' width of the sheet. There will be enough left over for the fore section and aft section sides and bottoms.
Take the angle for the fore and aft sections after you finish the center section of the boat. You can switch foreward/port and starboard/aft pieces for minimum waste as the angles will be close to identical.
A midships frame or outwale at the sheer may be needed to maintain the shape. There is enough wood in the specification to enable ripping 2 x 4s for these. If there is enough scrap plywood to combine with ripped 2 x 4s to make a cap on the hull sides end grain it would both provide a box girder at the sheer and protect the
end grain of the plywood.
The bottom overlaps the bottom edge of the hull sides for a better joint. |