 After successful completion of several built ' Instant
Boats ' - the " Elegant Punt ", four " Pointy Skiffs " and a " June Bug
", the desire to try my hand at designing my own boat was a passion that played
repeatedly in the back of my mind. When my last and only boat was sold, that temptation
had now become too overwhelming to resist! With tools and materials in hand, no actual
drawn up plans to follow and armed only with the experience and knowledge acquired from
having built the aforementioned boats, I came up with a fine craft that met all of my
expectations and more! After successful completion of several built ' Instant
Boats ' - the " Elegant Punt ", four " Pointy Skiffs " and a " June Bug
", the desire to try my hand at designing my own boat was a passion that played
repeatedly in the back of my mind. When my last and only boat was sold, that temptation
had now become too overwhelming to resist! With tools and materials in hand, no actual
drawn up plans to follow and armed only with the experience and knowledge acquired from
having built the aforementioned boats, I came up with a fine craft that met all of my
expectations and more!
I call her the " Bol-Pay " - in
recognition of Phil Bolger's indisputable boat designing skill, and for Harold "
Dynamite " Payson's well written books that can teach just about anyone, regardless
of woodworking experience, on just how easy it can be to build your very own boat and
amazingly, in no time at all.
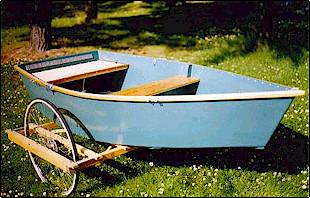
My sights were set on a boat that would be used primarily for solo fishing.
It's length was to be no greater than eight feet. A boat that is capable of being
transported on a 'cart' over rough terrain and through narrow steep trails so that I can
easily reach any one of the small, semi-secluded lakes I enjoy fishing at in our
beautiful, pristine wilderness - some lakes are well kept secret locations and I had to
solemly swear to never tell before I could be accepted into the so called
"elite" angling group circle ( it wasn't really, elite that is! ) - " ....
and above all keep it confidential, highly classified information! ", I was
repeatedly told. And for years, I have kept those promises with utmost care and trust! The
boat should also be able to comfortably accommodate one or possibly two adults with ample
storage capacity to spare and provide safe stability for the kids during those fun times
at the beach. Furthermore, it has to perform exceptionally well under oar or battery power
and is light enough to be lifted well above the shoulders so that the effort needed to put
the boat on and take it off the roof racks never becomes an overly exhaustive, painstaking
task. This would also include the occasional time when it may be necessary to carry the
boat a short distance in order to reach, say... a certain targeted lake - for example :
one that is just slightly off the main trail where a boat cart cannot go because of rocks,
trees or other obstacles.
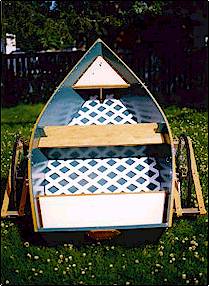 The
stern and bow seats are optional. I factored them in mainly for the kids and for the rare
time when I might have an adult aboard. Other than that, when using the boat solo, it's
best to remain seated at all times on the rowing thwart since the boat is afterall, very
small and somewhat unstable if one were to sit elsewhere without some means of counter
balance. Do take note of the white 'plastic fence lattice' on the floor. There are a
variety of benefits that can be obtained from using this plastic lattice. It acts as
a good barrier by providing excellent protection to the floor's painted surface against
such things as scuffing, scratches or any other possible wear and tear that could occur by
crew activity and/or from the loading and unloading of gear. Furthermore, it can
greatly enhance any boat's overall appearance and will maintain that look of being new for
years to come. More importantly, it will keep your feet from contacting any collected
water/sand/pebbles.. , acts as a very good anti-slip surface, helps to distribute weight
evenly, strengthens the floor immensely and requires virtually no maintenance whatsoever -
won't crack, peel or chip and is completely removable, washable, waterproof, never needs
painting and is flexible enough to easily conform to the curvature of any boat floor.
Wonderful stuff indeed! The
stern and bow seats are optional. I factored them in mainly for the kids and for the rare
time when I might have an adult aboard. Other than that, when using the boat solo, it's
best to remain seated at all times on the rowing thwart since the boat is afterall, very
small and somewhat unstable if one were to sit elsewhere without some means of counter
balance. Do take note of the white 'plastic fence lattice' on the floor. There are a
variety of benefits that can be obtained from using this plastic lattice. It acts as
a good barrier by providing excellent protection to the floor's painted surface against
such things as scuffing, scratches or any other possible wear and tear that could occur by
crew activity and/or from the loading and unloading of gear. Furthermore, it can
greatly enhance any boat's overall appearance and will maintain that look of being new for
years to come. More importantly, it will keep your feet from contacting any collected
water/sand/pebbles.. , acts as a very good anti-slip surface, helps to distribute weight
evenly, strengthens the floor immensely and requires virtually no maintenance whatsoever -
won't crack, peel or chip and is completely removable, washable, waterproof, never needs
painting and is flexible enough to easily conform to the curvature of any boat floor.
Wonderful stuff indeed!
A circular saw seemed to be the best tool to use for cutting the lattice to
shape. If you are going to cut it on your lawn, make sure to place something underneath to
capture the shavings because they can easily mingle within the grass and it becomes next
to impossible to rake it all out.
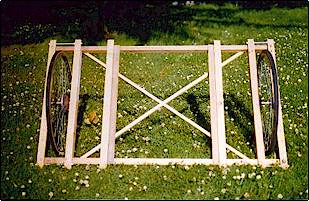 This
' boat cart ' was made from scrap pieces of wood and plenty
of hardware. It was actually built with more complexity than need be as I did get a little
carried away with it's creativity. Nonetheless, I really don't know what I would have done
without it. All my boats did fit as snug as a bug on the cart and transporting them from
yard to car, car to water and vise-versa was indeed an effortless task. Loading a boat
into the back of a pick-up truck was a breeze too. Merely bring the boat up close to the
tailgate, tilt back and then move it forward until it's at least a foot or so in, then
just lift the boat up off the cart and slide it straight in - nothing to it! Do the
reverse when taking the boat out. Someday I will take on the challenge of designing a cart
that will completely fold up for better storage purposes at home and for transporting in a
small car. I will also try to get busy on drawing up some plans of " Bol-Pay " free for the benefit of those who might have an
interest in building this boat. This
' boat cart ' was made from scrap pieces of wood and plenty
of hardware. It was actually built with more complexity than need be as I did get a little
carried away with it's creativity. Nonetheless, I really don't know what I would have done
without it. All my boats did fit as snug as a bug on the cart and transporting them from
yard to car, car to water and vise-versa was indeed an effortless task. Loading a boat
into the back of a pick-up truck was a breeze too. Merely bring the boat up close to the
tailgate, tilt back and then move it forward until it's at least a foot or so in, then
just lift the boat up off the cart and slide it straight in - nothing to it! Do the
reverse when taking the boat out. Someday I will take on the challenge of designing a cart
that will completely fold up for better storage purposes at home and for transporting in a
small car. I will also try to get busy on drawing up some plans of " Bol-Pay " free for the benefit of those who might have an
interest in building this boat.
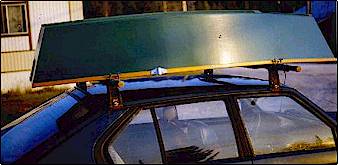 Here
the boat is mounted and secured on roof racks and I'm ready to head out to my favorite
fishing spot. Note the absence of using ropes, tie-downs or straps to secure the
boat down. The " U-bolt " method has proven to be quite effective for all of my
boats and has attracted the curiousity of many admirers. Several cartop boaters have
commented favorably on it's simplistic ingenuity and practicality and have stated that
they too will give it a try on their cartop boat. I often wonder if they actually did try
it? The worry of something coming loose while traveling down the road is virtually
eliminated. The only way the boat can come off is if the roof racks themselves should
happen to come off - of course, let's hope that never
happens! It must be noted that this method is applied to gutter type mounted roof racks (
as shown ) and it is unknown if this method is suitable for other types of roof racks - my
guess is it would be... but I would certainly appreciate any views or feedback in regards
to the feasibility of using this method on other roof rack types. Here
the boat is mounted and secured on roof racks and I'm ready to head out to my favorite
fishing spot. Note the absence of using ropes, tie-downs or straps to secure the
boat down. The " U-bolt " method has proven to be quite effective for all of my
boats and has attracted the curiousity of many admirers. Several cartop boaters have
commented favorably on it's simplistic ingenuity and practicality and have stated that
they too will give it a try on their cartop boat. I often wonder if they actually did try
it? The worry of something coming loose while traveling down the road is virtually
eliminated. The only way the boat can come off is if the roof racks themselves should
happen to come off - of course, let's hope that never
happens! It must be noted that this method is applied to gutter type mounted roof racks (
as shown ) and it is unknown if this method is suitable for other types of roof racks - my
guess is it would be... but I would certainly appreciate any views or feedback in regards
to the feasibility of using this method on other roof rack types.
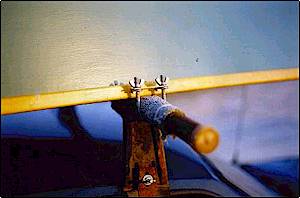 Front
view - the U-Bolts are 1 3/4" wide X 3" long. If your roof racks happen to have square
cross members instead of tubular then just simply use square type U-bolts. These
roof racks were purchased at a garage sale and with just a little sanding and some rust
paint they should look as good as new. With the extra extension of the racks on either
side of the boat I can also fasten down such things as oars or a mast on them. This
extra extension can also have it's dangers, especially on small cars, if one is not
careful. As you get out and stand up, your head could abruptly hit against a rack
providing you with a rather nasty feeling of discomfort. I learned my lesson after several
experiences and although it's second nature in avoiding them now I do sometimes forget to
mention this potential danger to others and when I do mention it , well, by then it's too
late as evidenced by the sound of a loud thump and the inevitable... " ooouch!"
Oooops... my apologies are then quickly in order. Maybe I should wrap the ends in foam or
anything else that can provide adequate cushion. Front
view - the U-Bolts are 1 3/4" wide X 3" long. If your roof racks happen to have square
cross members instead of tubular then just simply use square type U-bolts. These
roof racks were purchased at a garage sale and with just a little sanding and some rust
paint they should look as good as new. With the extra extension of the racks on either
side of the boat I can also fasten down such things as oars or a mast on them. This
extra extension can also have it's dangers, especially on small cars, if one is not
careful. As you get out and stand up, your head could abruptly hit against a rack
providing you with a rather nasty feeling of discomfort. I learned my lesson after several
experiences and although it's second nature in avoiding them now I do sometimes forget to
mention this potential danger to others and when I do mention it , well, by then it's too
late as evidenced by the sound of a loud thump and the inevitable... " ooouch!"
Oooops... my apologies are then quickly in order. Maybe I should wrap the ends in foam or
anything else that can provide adequate cushion.
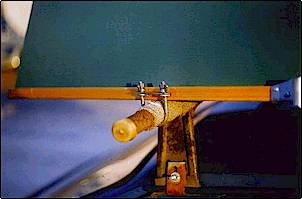 Back
view - for fast, efficient application be sure to use wing nuts - this eliminates the need
for wrenches. Do keep a few spare wing nuts in the trunk or tackle box for safe keeping in
the event one or two get misplaced or you inadvertently drop one on the ground and for
some reason you just can't find it or get to it. It once happened to me in a parking lot
when a wing nut fell out of my hands, bounced off the pavement and disappeared straight
down into a water drain. By the way , it would be wise to keep a spare 'U-bolt
assembly' just in case something should happen to one of them too. Always make sure
that the 'flat cross plate', which usually comes as part of the 'U-bolt assembly', is used
as shown in the front and back views. Back
view - for fast, efficient application be sure to use wing nuts - this eliminates the need
for wrenches. Do keep a few spare wing nuts in the trunk or tackle box for safe keeping in
the event one or two get misplaced or you inadvertently drop one on the ground and for
some reason you just can't find it or get to it. It once happened to me in a parking lot
when a wing nut fell out of my hands, bounced off the pavement and disappeared straight
down into a water drain. By the way , it would be wise to keep a spare 'U-bolt
assembly' just in case something should happen to one of them too. Always make sure
that the 'flat cross plate', which usually comes as part of the 'U-bolt assembly', is used
as shown in the front and back views.
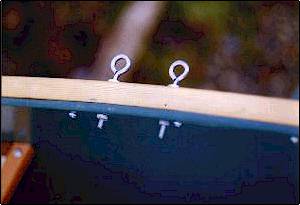 The
eyebolts are 3/16" X 2 1/2". Do not use the screw type eyebolts as they may come
loose. It must be the " nut " type to ensure a permanent, more safer attachment.
Use a drill bit that is at least one size smaller than the diameter of the thread .
Make sure to place a small block of wood firmly against the inside of the side panel wall
to prevent the drill bit from possibly tearing out the plywood when it passes through. Put
a nut and washer on each bolt and then screw the bolt in until the washer
meets the gunwale. Putting an optional one piece 'washer plate' on the gunwale and/or on
the inside of the side panel wall will help to increase overall holding strength in these
areas. Hack saw all excess thread flush to the nut ( not shown ) - file off any burrs or
protruding jagged edges. The
eyebolts are 3/16" X 2 1/2". Do not use the screw type eyebolts as they may come
loose. It must be the " nut " type to ensure a permanent, more safer attachment.
Use a drill bit that is at least one size smaller than the diameter of the thread .
Make sure to place a small block of wood firmly against the inside of the side panel wall
to prevent the drill bit from possibly tearing out the plywood when it passes through. Put
a nut and washer on each bolt and then screw the bolt in until the washer
meets the gunwale. Putting an optional one piece 'washer plate' on the gunwale and/or on
the inside of the side panel wall will help to increase overall holding strength in these
areas. Hack saw all excess thread flush to the nut ( not shown ) - file off any burrs or
protruding jagged edges.
You could use a decorative 'cap nut' to get a more pleasing, professional finish if
desired. See if you can utilize the excess thread anyways, before making that final
decision to cut them off - perhaps attaching or hanging some permanent or temporary device
to them while out on the water, if not, then by all means saw away.
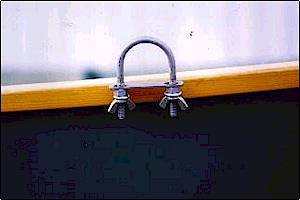 There
can be additional benefits in using these U-bolts other than just for securing down your
boat on roof racks. Facing up they can be used as makeshift oarlocks or a fishing rod
holder. It also makes for a good spot to tie a rope to when mooring at the dock, or
perhaps to hang your boat from the garage ceiling/wall should storage limitation be a
concern - you may think of other practical uses as well. As shown, regular nuts are used
with the wing nuts on the U-bolt assembly to secure it tightly in place . The same goes
for facing down. There
can be additional benefits in using these U-bolts other than just for securing down your
boat on roof racks. Facing up they can be used as makeshift oarlocks or a fishing rod
holder. It also makes for a good spot to tie a rope to when mooring at the dock, or
perhaps to hang your boat from the garage ceiling/wall should storage limitation be a
concern - you may think of other practical uses as well. As shown, regular nuts are used
with the wing nuts on the U-bolt assembly to secure it tightly in place . The same goes
for facing down.
 Facing
down it can be used to tie a rope to hold anything that you might want to keep temporarily
submerged - bait, catch or perhaps for keeping your 'beverage supply" at a cool
temperature. Securing an 'anchor rope' here is not really recommended as it may not be
strong enough to hold a boat in position from strong winds and/or currents - there's a
good chance that the U-bolt assembly could be torn off, possibly damaging your boat's
gunwale and/or side panel. Best to have your anchoring location at or near the bow. Facing
down it can be used to tie a rope to hold anything that you might want to keep temporarily
submerged - bait, catch or perhaps for keeping your 'beverage supply" at a cool
temperature. Securing an 'anchor rope' here is not really recommended as it may not be
strong enough to hold a boat in position from strong winds and/or currents - there's a
good chance that the U-bolt assembly could be torn off, possibly damaging your boat's
gunwale and/or side panel. Best to have your anchoring location at or near the bow.
Building an 'Instant Boat' or any other boat for that matter can be a wonderful
experience for most and as such it is not uncommon for many boatbuilders to come up with
their own sneaky but rather ingenious little trick/s that can be easily adapted to most
homemade boats. The willingness by these boatbuilders to share their own unique
creativities with others is remarkable and my hat goes off to them. It has effectively
given me the inspiration to share my experiences too and I can only hope that this article
qualifies as a welcomed contribution to this awesome generousity in the wacky world of
boatbuilding. Happy boatbuilding to all.
Dale Ruth - dldlnala@pgonline.com
- Prince George, British Columbia. |
